User Manual

Fleetune TMS User Manual

Dispatcher Console & Driver App — an operations guide organized as scenarios, in the order a new team actually uses the product.

This manual walks you through everything you need to run daily last-mile operations with Fleetune: one-time setup, dispatching routes, monitoring the day live, and reviewing history. It is organized as a series of scenarios in the order a new team actually uses the product. Each scenario states its goal, who performs it, what must be ready beforehand, and the exact steps to follow in the console (us.fleetune.com) or the Fleetune Driver app.

Note

Screens shown in this manual may differ slightly from the live product as features evolve. For current plan pricing, see the pricing section at us.fleetune.com.

Part 1First-Time Setup

Before you dispatch your first route, set up three things: your account preferences, a Plan Config (depot + optional delivery zones), and your drivers. This part takes 15–30 minutes for a typical fleet.

Scenario 1Set Your Operation Timezone and Display Preferences
GoalMake sure every ETA, schedule and report in the console is shown in your local operating time and preferred units.
WhoDispatcher (account owner)
Before you startA Fleetune account you can sign in with.
1
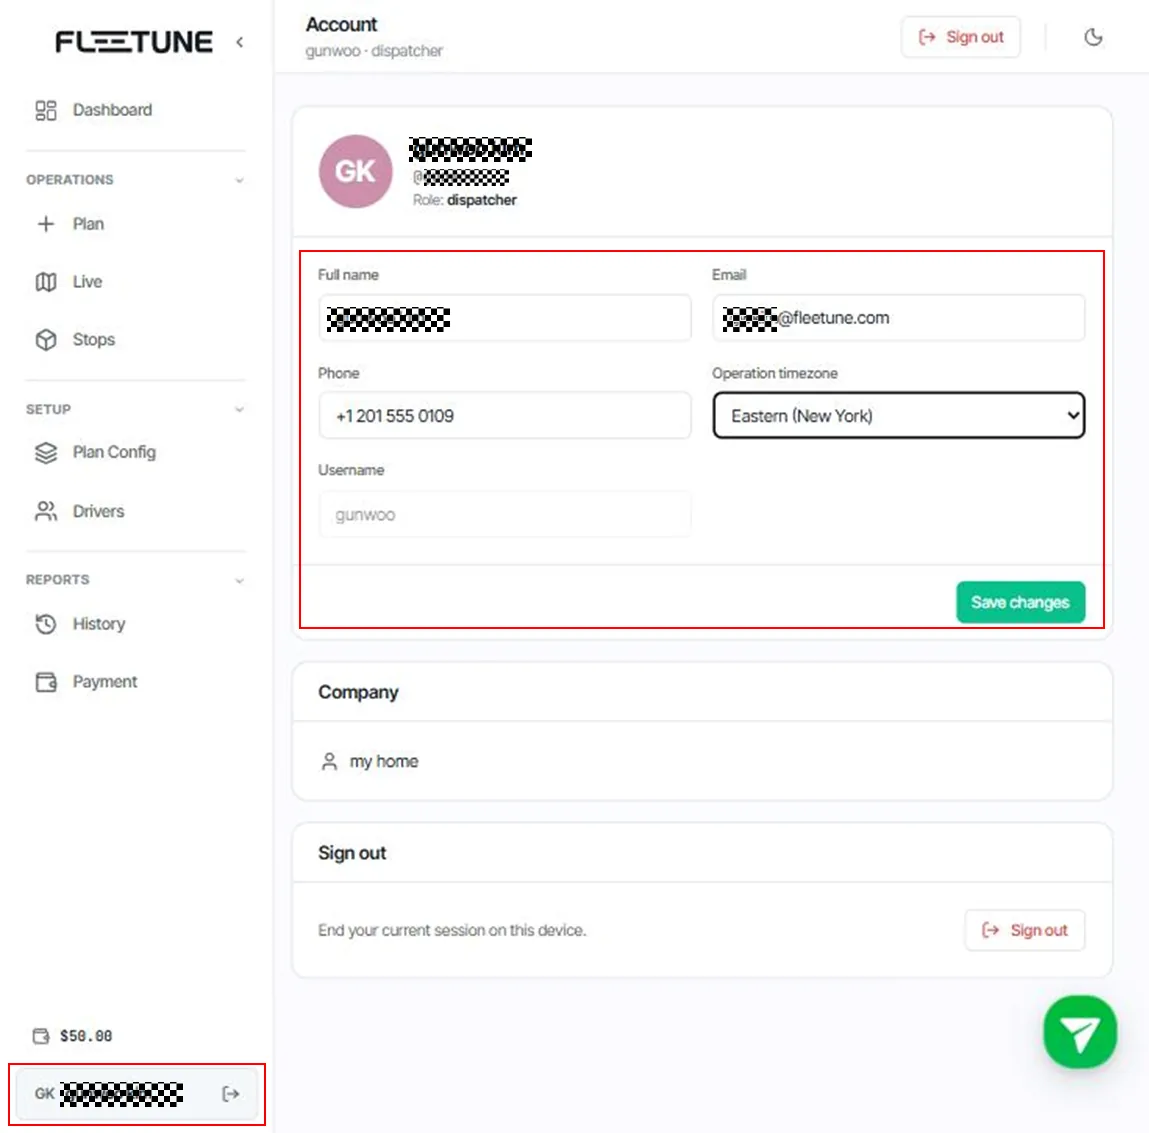
Click your profile chip at the bottom of the left sidebar and open Account.
2
Check Full name, Email, Company and Phone. To change your phone number you will be asked to verify the new number with a 6-digit code (Verify → enter code → Confirm).
3
Set Operation timezone to the timezone your fleet operates in. All schedules, ETAs and history timestamps follow this setting.
4
Click Save changes.
Set Your Operation Timezone and Display Preferences — screenshot 1
Tip

Distance units (miles/kilometers) and time format (1h 4m vs 64min) can be changed at any time from the Display popover on the Plan screen — they only affect how values are displayed, never how routes are calculated.

Scenario 2Create a Plan Config and Set Your Depot

GoalCreate the reusable configuration that dispatches start from: a named Plan Config with a depot (your warehouse or cross-dock) location.
WhoDispatcher
Before you startYour depot's street address.

A Plan Config bundles a depot and (optionally) delivery zones under one name, such as "North Dallas Metro". Standard dispatch can use just the depot; Zonal dispatch requires zones (Scenario 3).
1
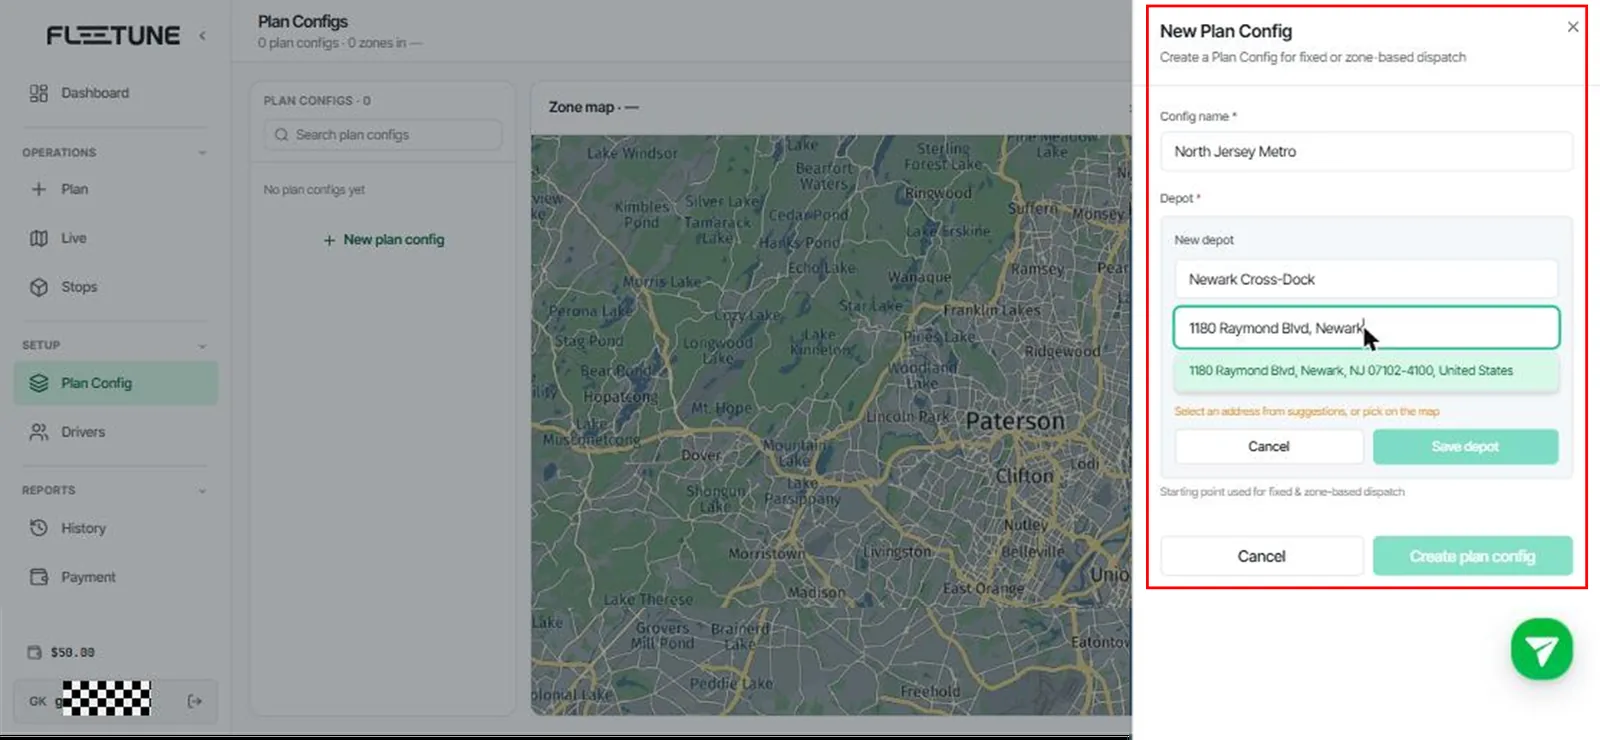
In the sidebar under Setup, open Plan Config.
2
Click New Plan Config. Give it a clear name (e.g. North Dallas Metro).
3
In the Depot section, enter the depot name (e.g. North Dallas Hub) and start typing the address. Select the address from the suggestions, or click directly on the map to pin the exact location.
4
Click Save.
Create a Plan Config and Set Your Depot — screenshot 1
Note

The depot is the starting point used by both fixed (Standard) and zone-based (Zonal) dispatch when "Start from depot" is on. You can edit it later with Edit depot location.

Tip

You can also supply depots per-dispatch by adding a "Depots" sheet to your stops workbook (see Scenario 6). A depot set in the Plan Config is the default.

Scenario 3Draw Delivery Zones and Assign Zone Drivers (for Zonal Dispatch)
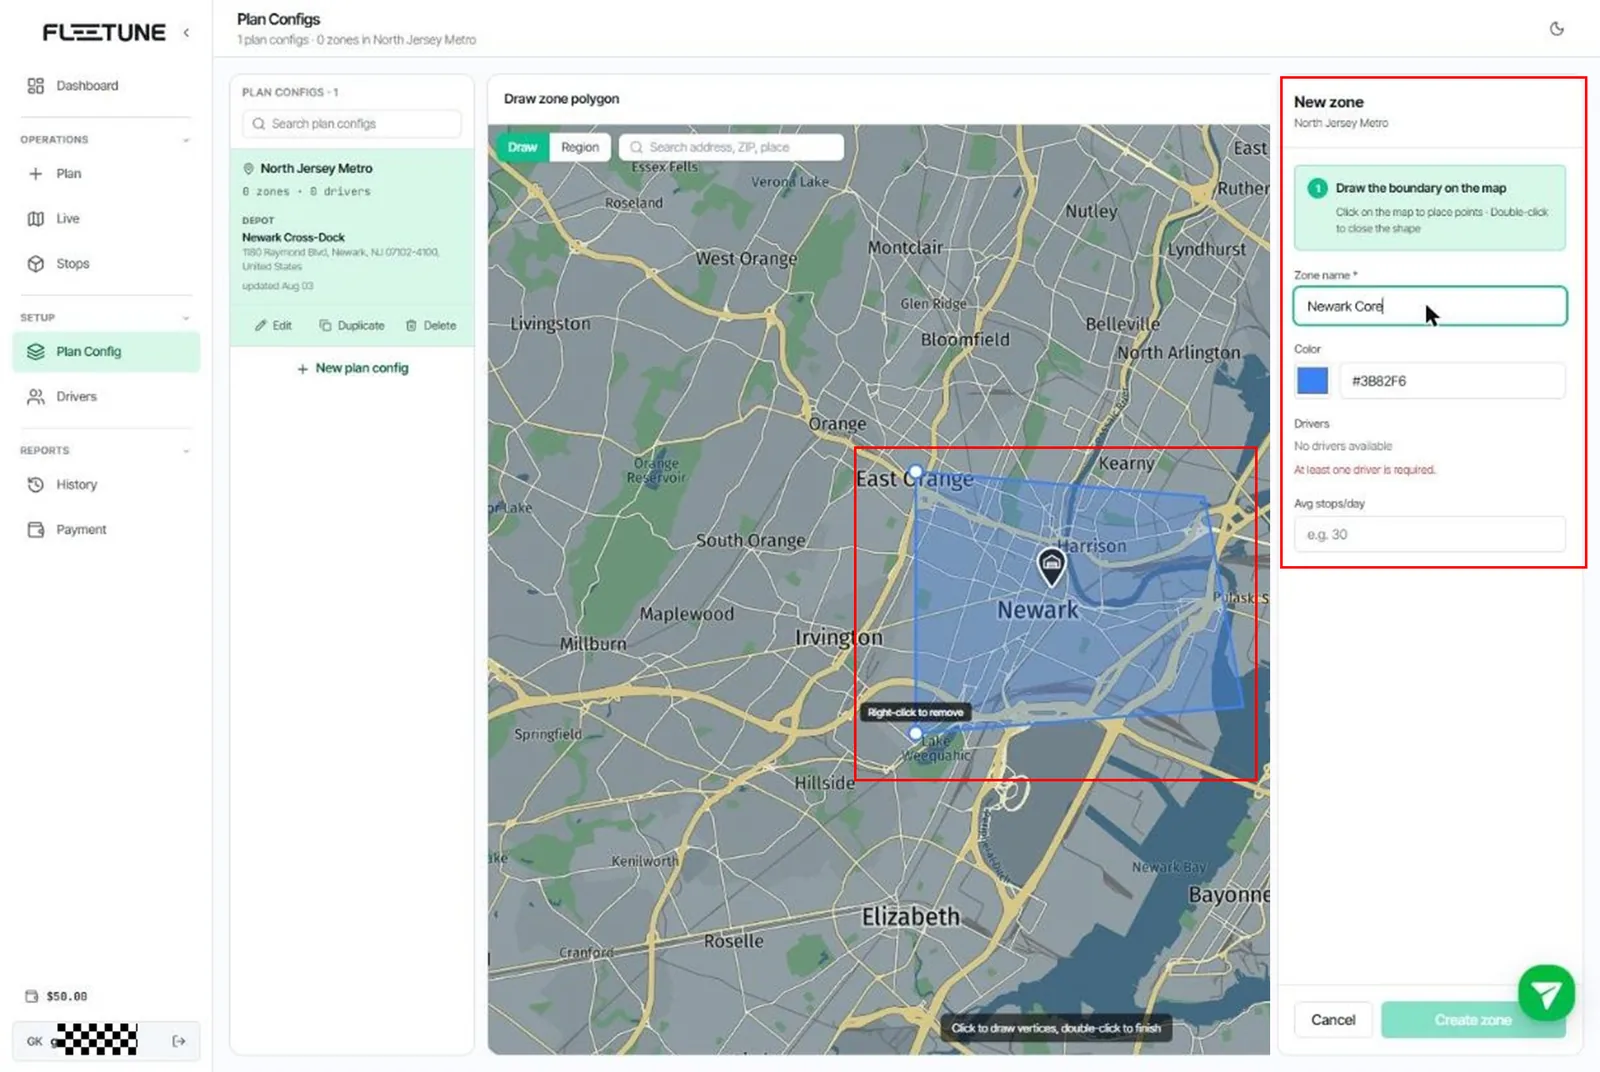
GoalSplit your service area into zones and fix which drivers serve each zone, so Zonal dispatch can assign work by territory.
WhoDispatcher
Before you startA Plan Config (Scenario 2); drivers registered (you can also come back after Scenario 4).
1
Open Plan Config and select your config.
2
Click New zone. Enter a Zone name and pick a Color.
3
Draw the zone on the map: click to place vertices, double-click to finish the polygon. Use Redraw or Remove point to correct it.
4
Instead of drawing by hand, you can load an administrative boundary: search an area and choose a boundary source — ZIP Code, County, or Tract.
5
Assign at least one driver to the zone with the driver picker (Search drivers…). A zone must have at least one driver.
6
Optionally set Avg stops/day for capacity planning, then click Save.
7
Repeat for each zone until your service area is covered.
Draw Delivery Zones and Assign Zone Drivers (for Zonal Dispatch) — screenshot 1
Tip

Upload a past stops file with Load stops file to overlay real delivery points on the map while you draw — zone borders are much easier to place when you can see where your actual demand is.

Note

Stops that fall outside every zone are reported as unassigned during Zonal dispatch, and you decide whether to accept or discard the result (Scenario 8).

Scenario 4Register Drivers

GoalAdd your drivers with the phone number they will use to sign in to the driver app, plus their vehicle and capacity.
WhoDispatcher
Before you startDriver names, mobile numbers, vehicle types and capacities.
1
In the sidebar under Setup, open Drivers and click Add driver.
2
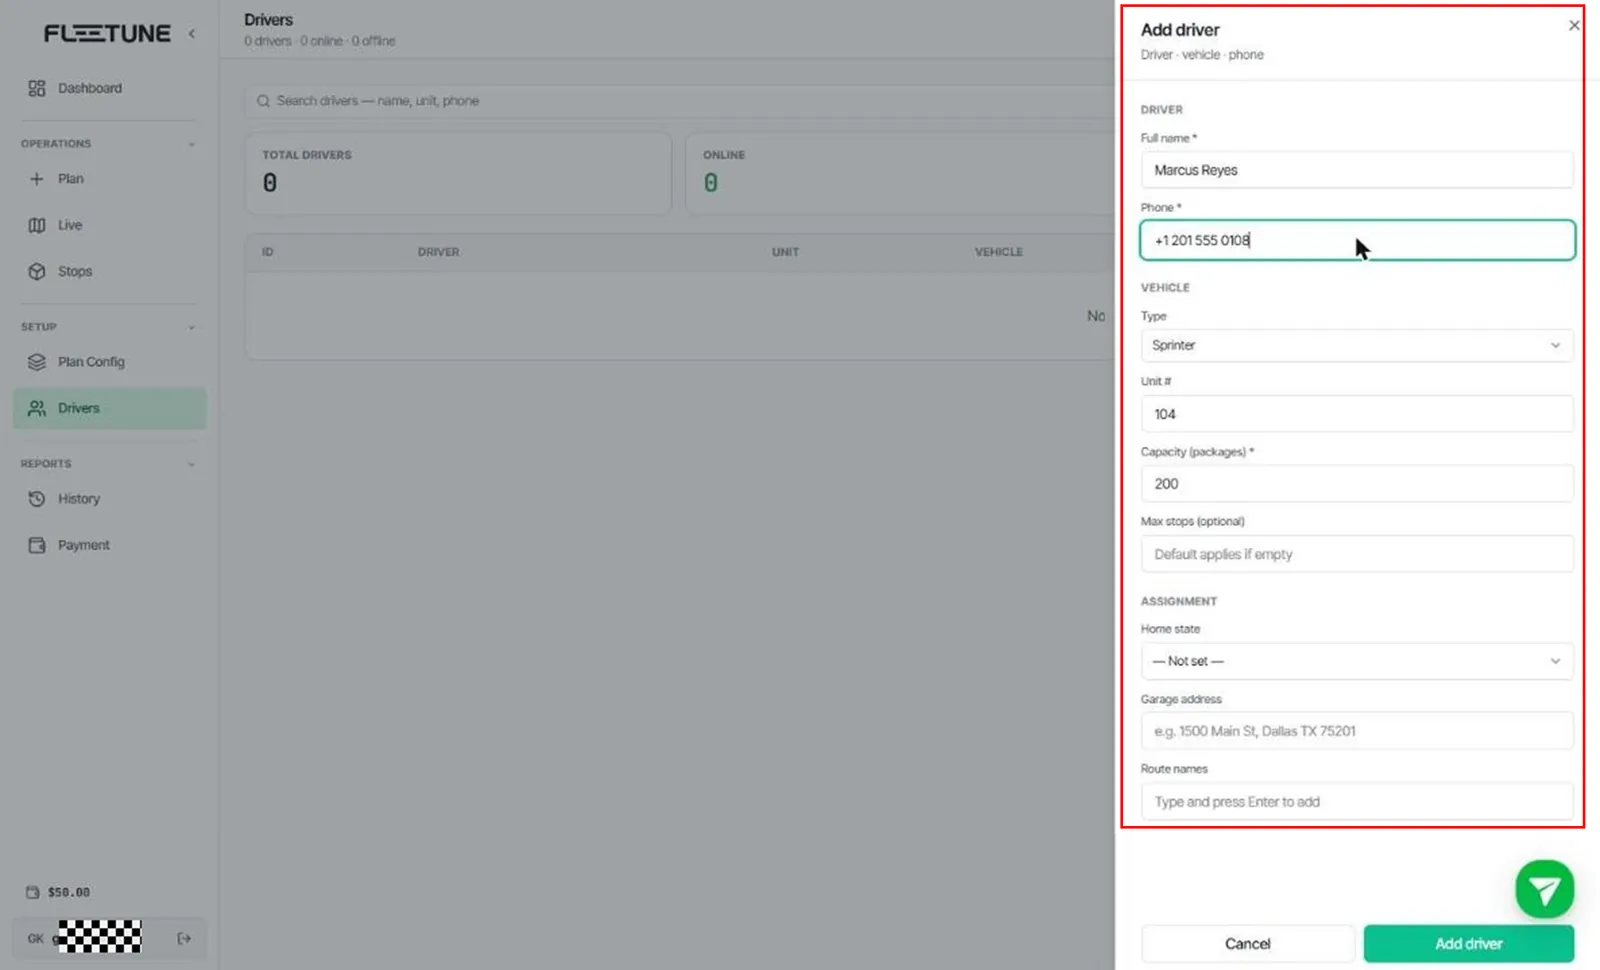
Fill in the sheet:
  • Full name and Phone — the phone number is the driver's app login identity, so it must be the driver's real mobile number.
  • Type (Sprinter, Box truck, Cargo van, Pickup) and Unit #.
  • Capacity (packages) — the load ceiling used when routes are built.
  • Max stops (optional) — per-driver cap; the dispatch default applies if empty.
  • Garage address (optional) — where this driver's routes can end when "End at: Garage" is selected.
3
Click Save changes.
4
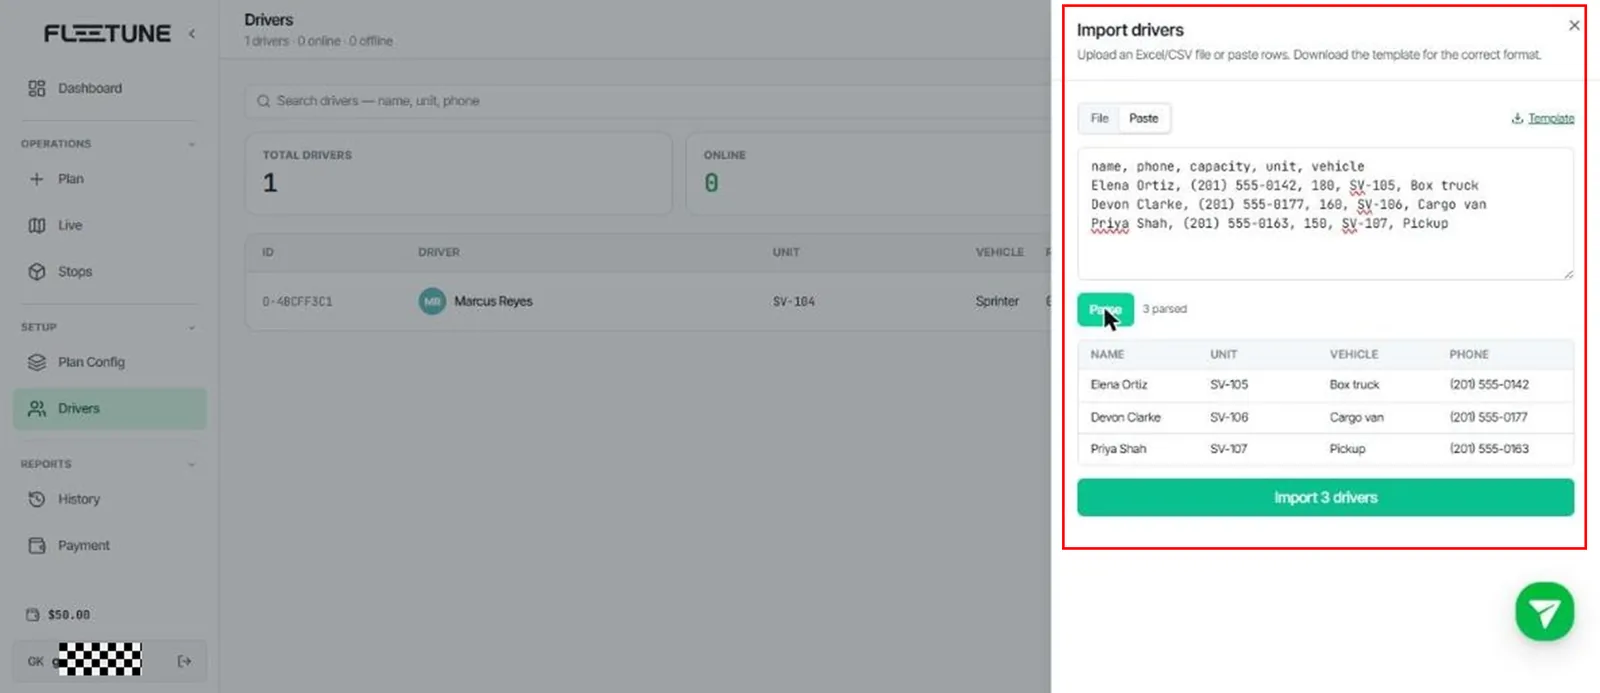
To add many drivers at once, click Import CSV, download the template, fill in name, phone, capacity, unit, vehicle, and upload — or paste rows directly and click Parse.
Register Drivers — screenshot 1
Register Drivers — screenshot 2
Note

Truck-class vehicles can carry height/width/length/weight dimensions, which are used for truck-legal routing when the dispatch vehicle option is set accordingly.

Scenario 5Driver App Onboarding (Driver's Phone)

GoalGet each driver signed in to the Fleetune Driver app and correctly permissioned before their first route.
WhoDriver (guided by dispatcher)
Before you startDriver registered in the console with their mobile number (Scenario 4); app installed on the driver's phone.
1
Open the app. On the Sign in screen, enter the phone number your dispatcher has on file and tap Send code.
2
Enter the 6-digit code from the text message and tap Verify. (Use Resend code if it doesn't arrive, or Change number to correct a typo.)
3
Grant permissions when prompted:
  • Allow location, then Allow all the time — dispatch needs live location while you drive.
  • Allow camera — required for proof-of-delivery photos.
  • Exclude Fleetune from battery saving — prevents the phone from silently stopping location updates mid-route.
4
Choose your navigation app (Google Maps, Apple Maps on iOS, or Waze). You can change this anytime in Settings.
Tip

In Settings → Driving, drivers can turn on Auto-arrival so the delivery confirmation opens automatically when they get near the stop (default radius 300 ft), and Auto-navigate after PoD to jump straight to navigation for the next stop after submitting proof.

Note

If a driver can't sign in, the most common cause is a phone number mismatch — verify the number saved on the Drivers page matches the driver's device exactly.

Part 2Dispatching Routes

The Plan screen is where a day's work is created: import stops, choose options, create routes, and push them to drivers. The screen guides you through 4 steps: 1 Import stops → 2 Options → 3 Create routes → 4 Push to drivers.

Scenario 6Import Stops

GoalLoad today's delivery stops into the Plan screen — from a file, a Google Sheet, or typed by hand — with clean geocoded addresses.
WhoDispatcher
Before you startToday's stop list (or use Manual entry for a small run).
1
In the sidebar under Operations, open Plan.
2
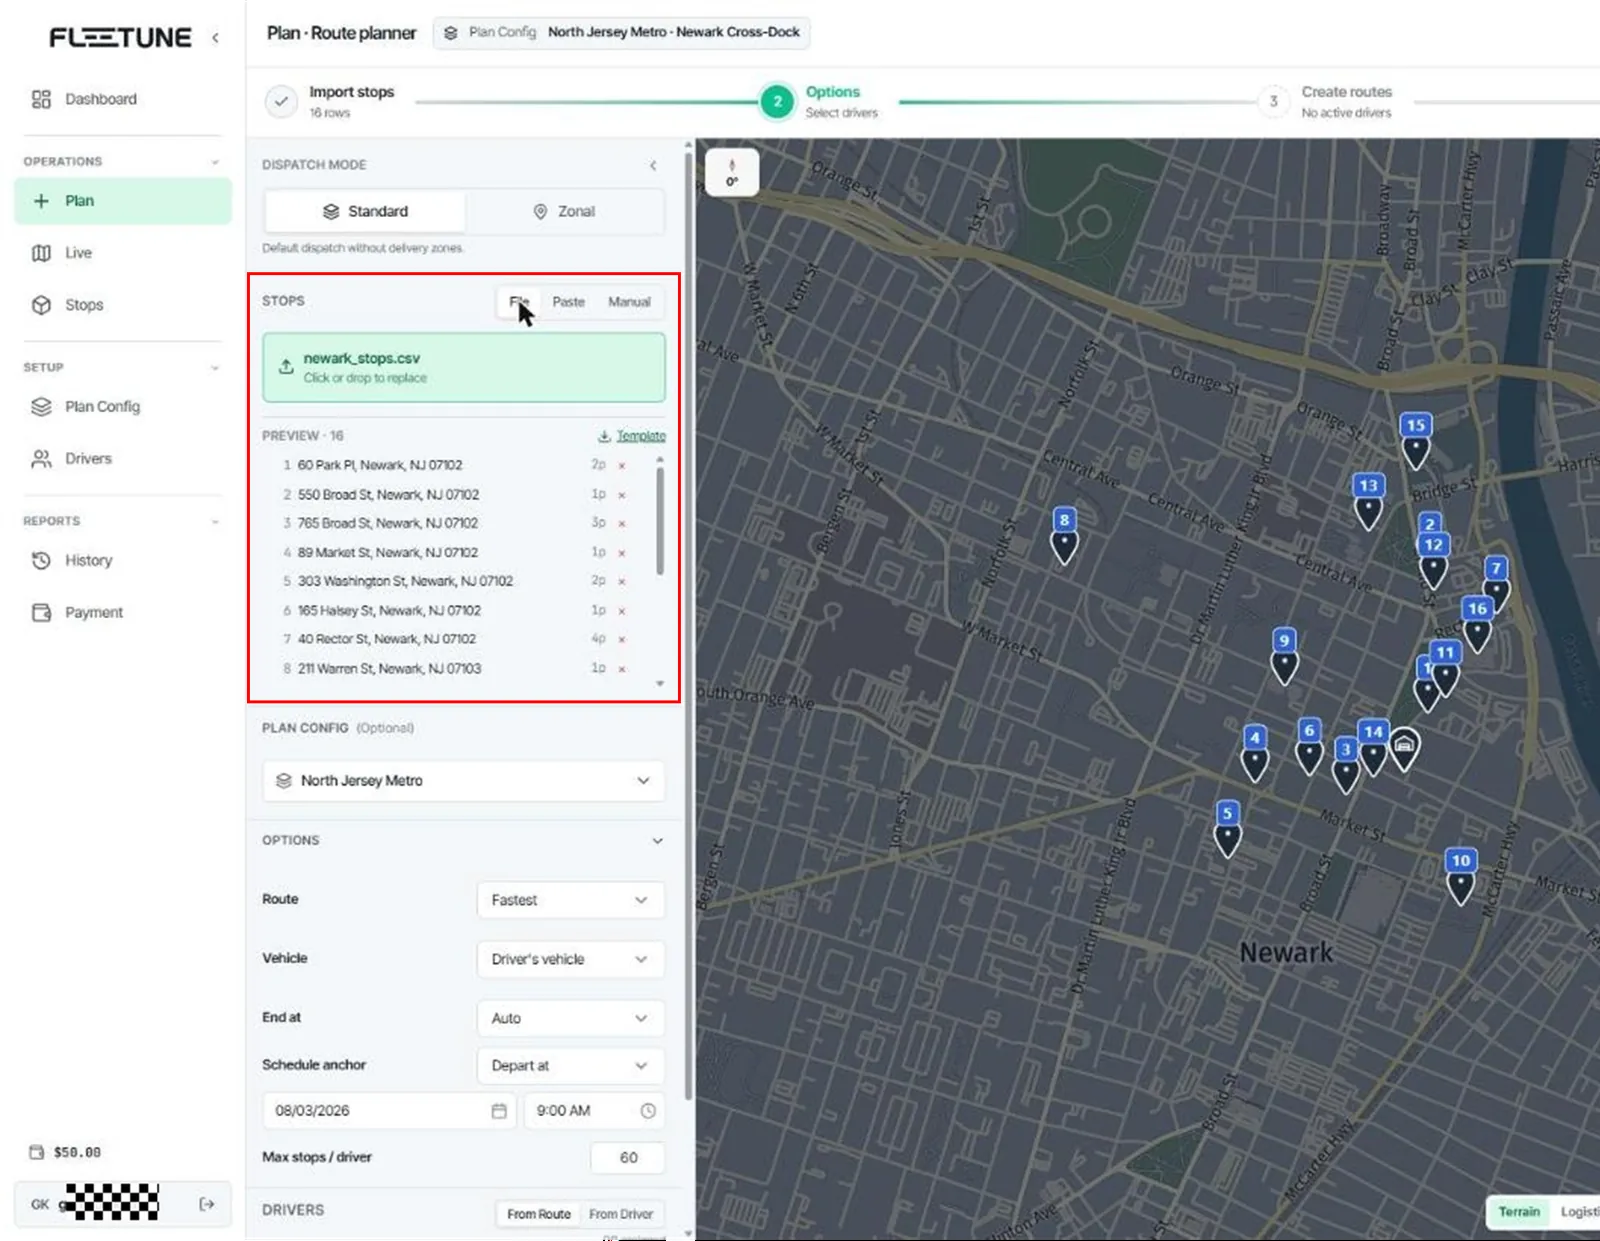
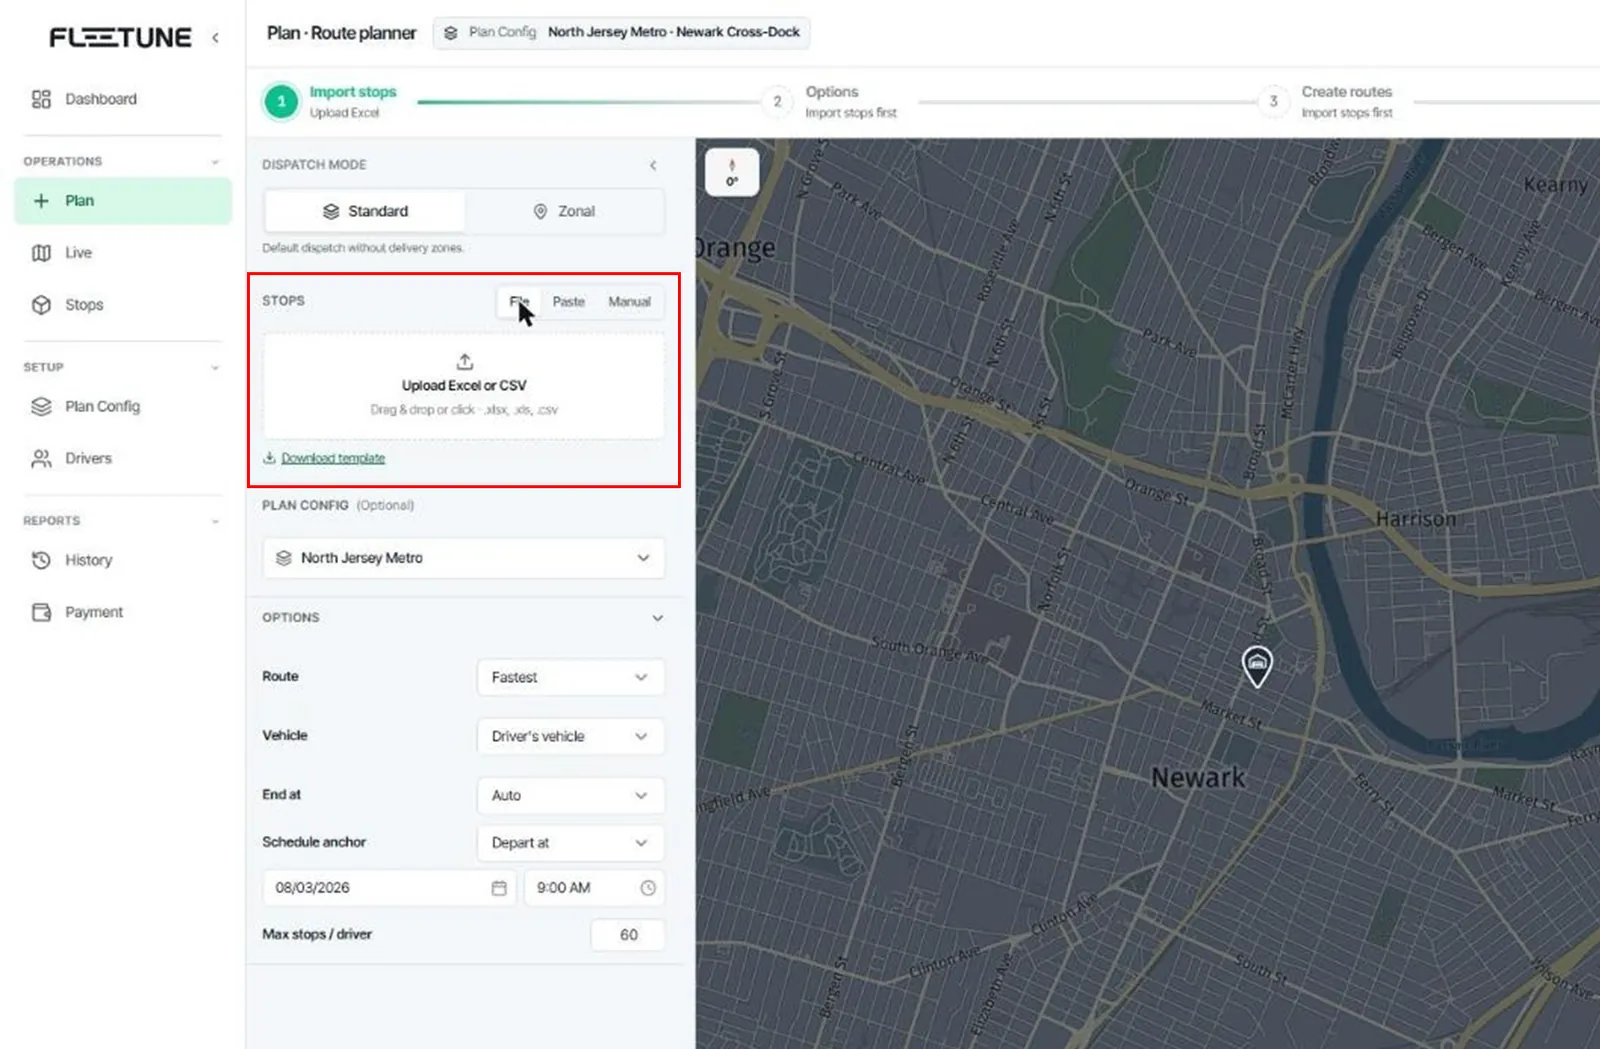
In the Stops section pick an input method:
  • File — drag and drop an Excel/CSV file, or click to browse. Click Download template first if you don't have a file in the right shape yet.
  • Paste — paste a Google Sheets URL. The sheet must be shared publicly as viewer.
  • Manual — type an address, packages, recipient and optional route name, then click + Add stop. Repeat per stop.
3
Watch the geocoding progress ("Geocoding 12 / 80…"). Rows that fail to parse are listed in Parse errors detected — fix them in the source file and re-upload, or continue without them.
4
Confirm the row count shown in step 1 of the progress rail ("{n} rows").
Import Stops — screenshot 1
Import Stops — screenshot 2

Column

Meaning

Stop #

Optional fixed visiting order within a route

Address

Delivery address (required)

Packages / Pkgs / Qty

Package count (default 1)

Service time / Working minutes

Time spent at the stop

Recipient / Customer

Recipient name

Phone

Recipient phone

Window start / Window end

Delivery time window

Note 1–3

Free-text notes shown to the driver

Arrival notify

Send the recipient an arrival notification

POD photo / POD signature

Require photo / signature proof at this stop

Reference / PO / Order

Your order reference

Route

Groups stops under a named route (pre-grouping)

Tip

The same workbook can include a "Drivers" sheet and a "Depots" sheet (depot type: Delivery, Pickup, or Both) — one upload can carry the whole day's plan.

Note

A stop must geocode to coordinates to be dispatched. "Import at least 1 stop with coordinates" on the dispatch button means no rows geocoded successfully.

Scenario 7Run a Standard Dispatch

GoalCreate optimized routes across your selected drivers without zone boundaries — the default mode for most operations.
WhoDispatcher
Before you startStops imported (Scenario 6); at least one driver registered.
1
On Plan, set Dispatch mode to Standard ("Default dispatch without delivery zones.").
2
Under the config selector, choose Select Depot — pick a Plan Config with a depot, or None — dispatch without a depot. Toggle Start from depot on or off.
3
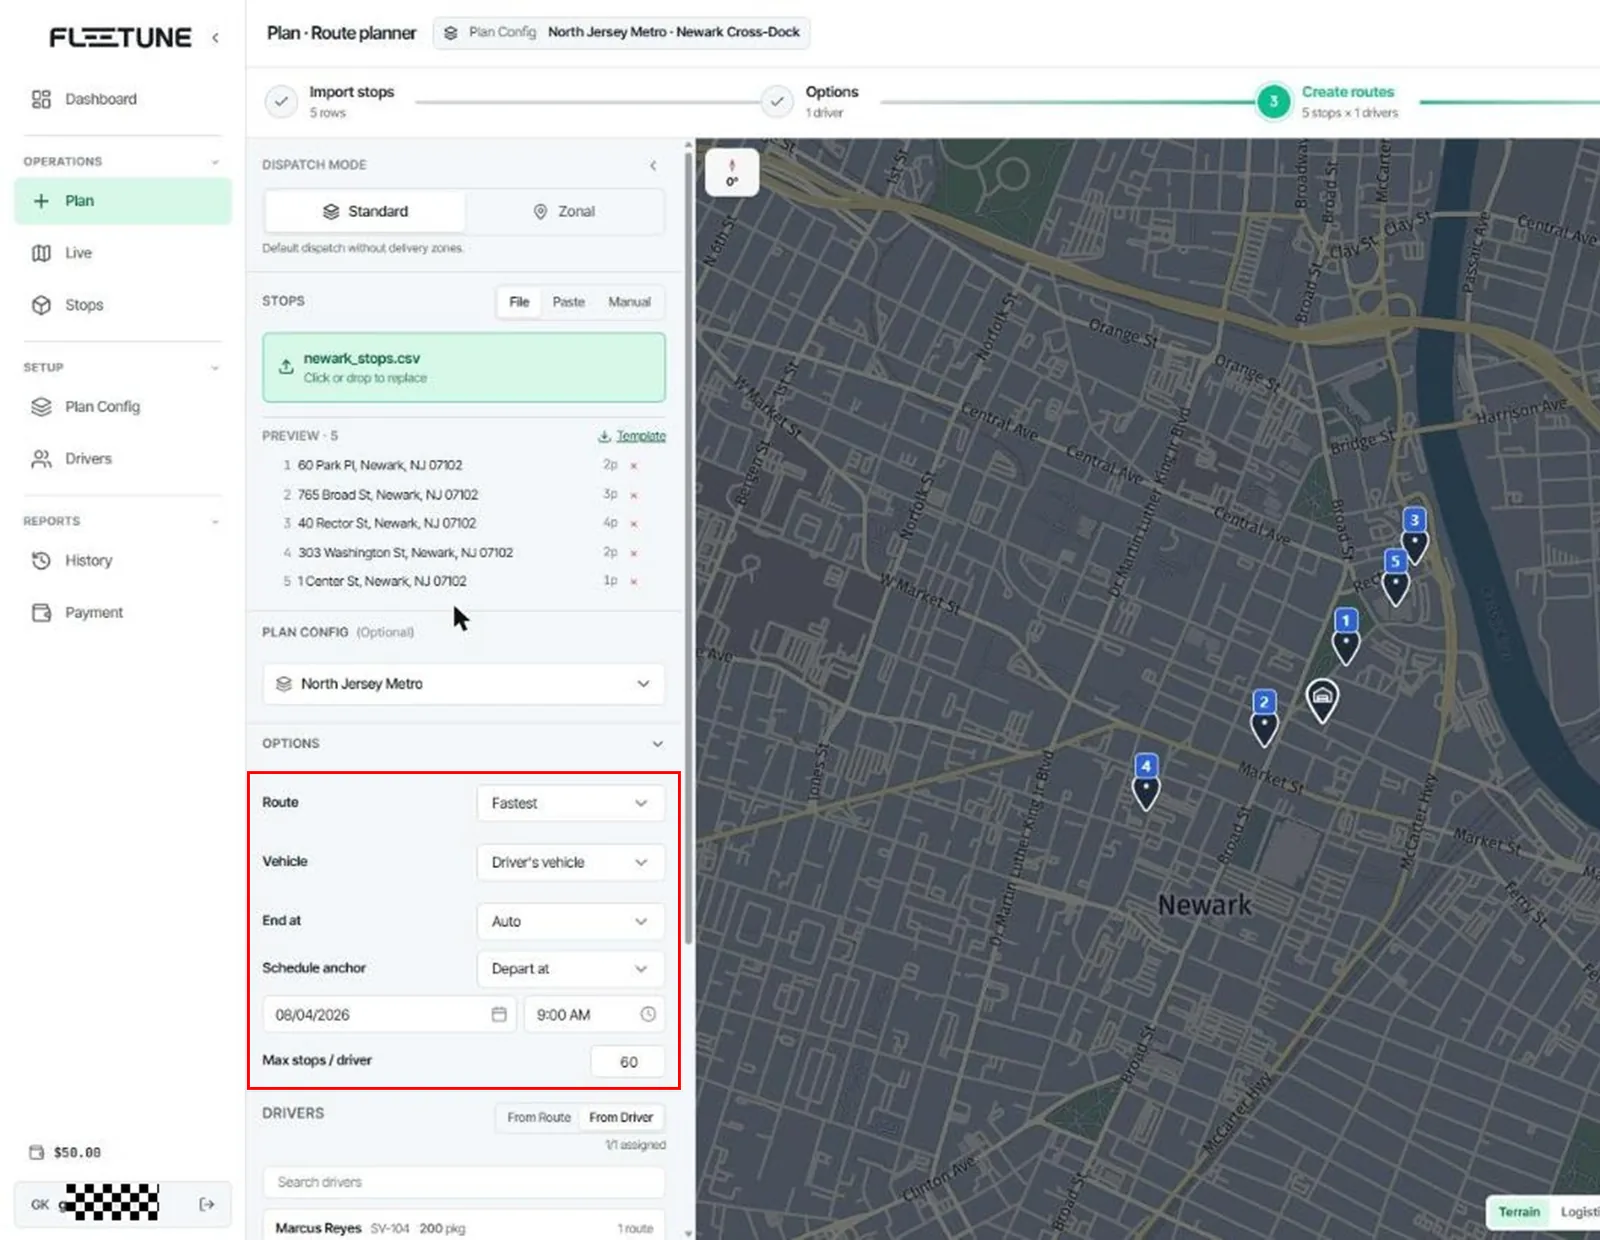
Open Options and review:
  • Route: Fastest or Avoid tolls.
  • Vehicle: Driver's vehicle, Car, or Custom truck (with dimensions).
  • End at: Auto, Depot, or Garage (uses each driver's garage address).
  • Schedule anchor: Depart at a fixed start time, or Arrive by a deadline (routes are planned backward).
  • Max stops / driver (empty = Unlimited).
4
In the Drivers section, include the drivers who work today (search and toggle).
5
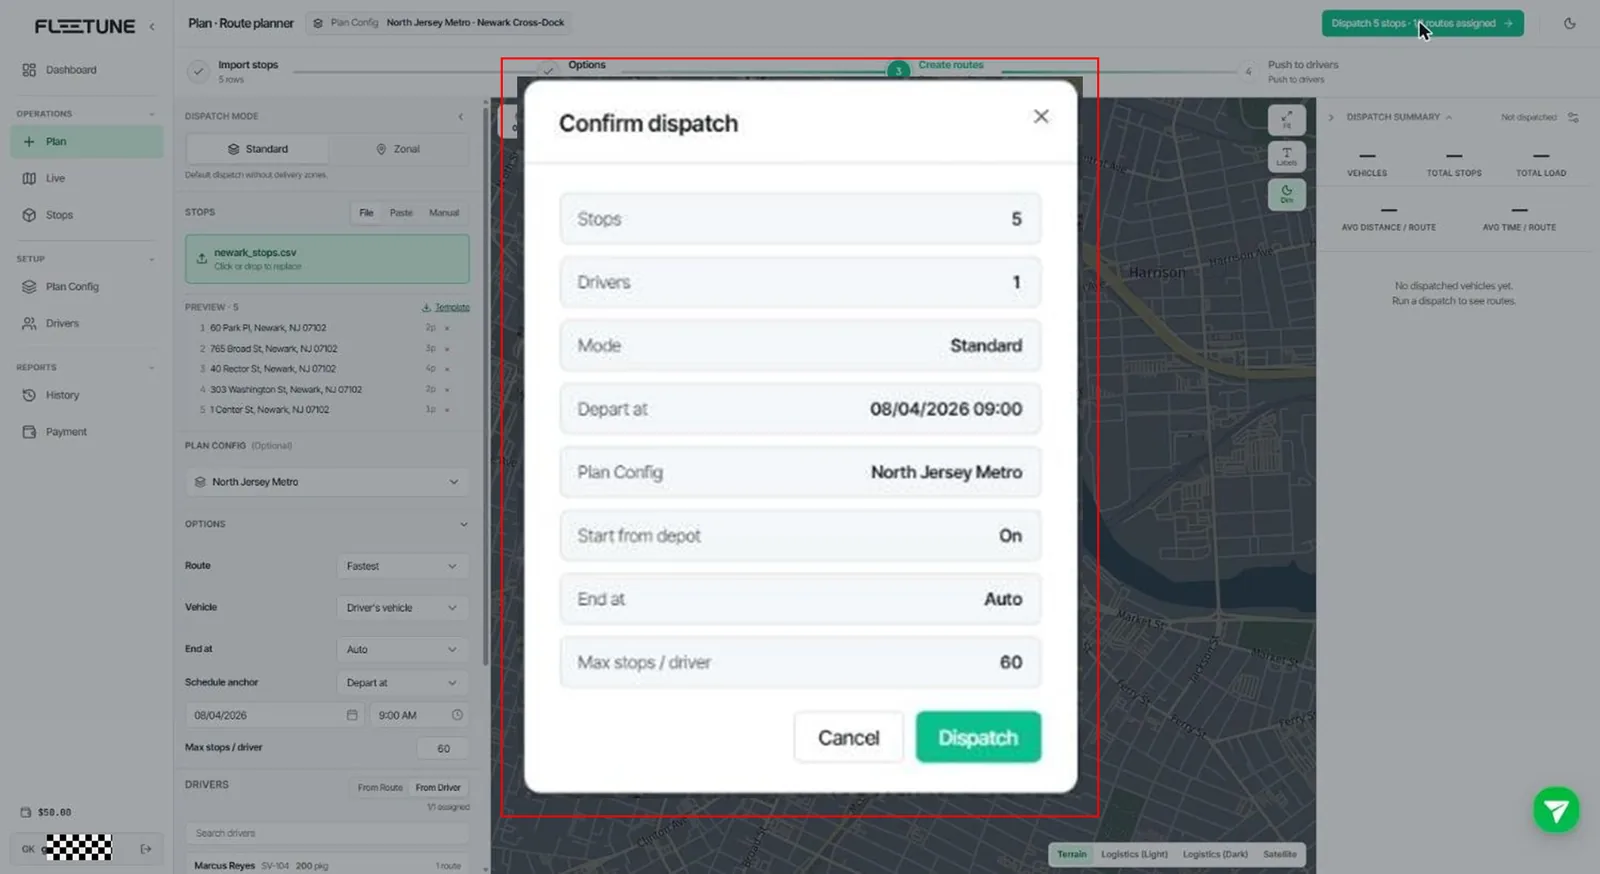
Click the dispatch button ("Dispatch {stops} stops · {drivers} drivers") and review the Confirm dispatch summary — stops, drivers, mode, schedule, depot, end anchor. Click Dispatch.
6
Wait for the progress overlay to reach 100%. Routes appear on the map and in the result list.
Run a Standard Dispatch — screenshot 1
Run a Standard Dispatch — screenshot 2
Run a Standard Dispatch — screenshot 3
Note

If you schedule "Depart at" in the past, Fleetune warns you ("Still in the past…") — pick a future time or confirm Dispatch anyway.

Note

Creating routes does not notify drivers yet. Nothing reaches the driver app until you Apply (Scenario 9).

Scenario 8Run a Zonal Dispatch

GoalDispatch by fixed territories — every stop goes to a driver assigned to the zone it falls in.
WhoDispatcher
Before you startPlan Config with zones drawn and zone drivers assigned (Scenario 3); stops imported.
1
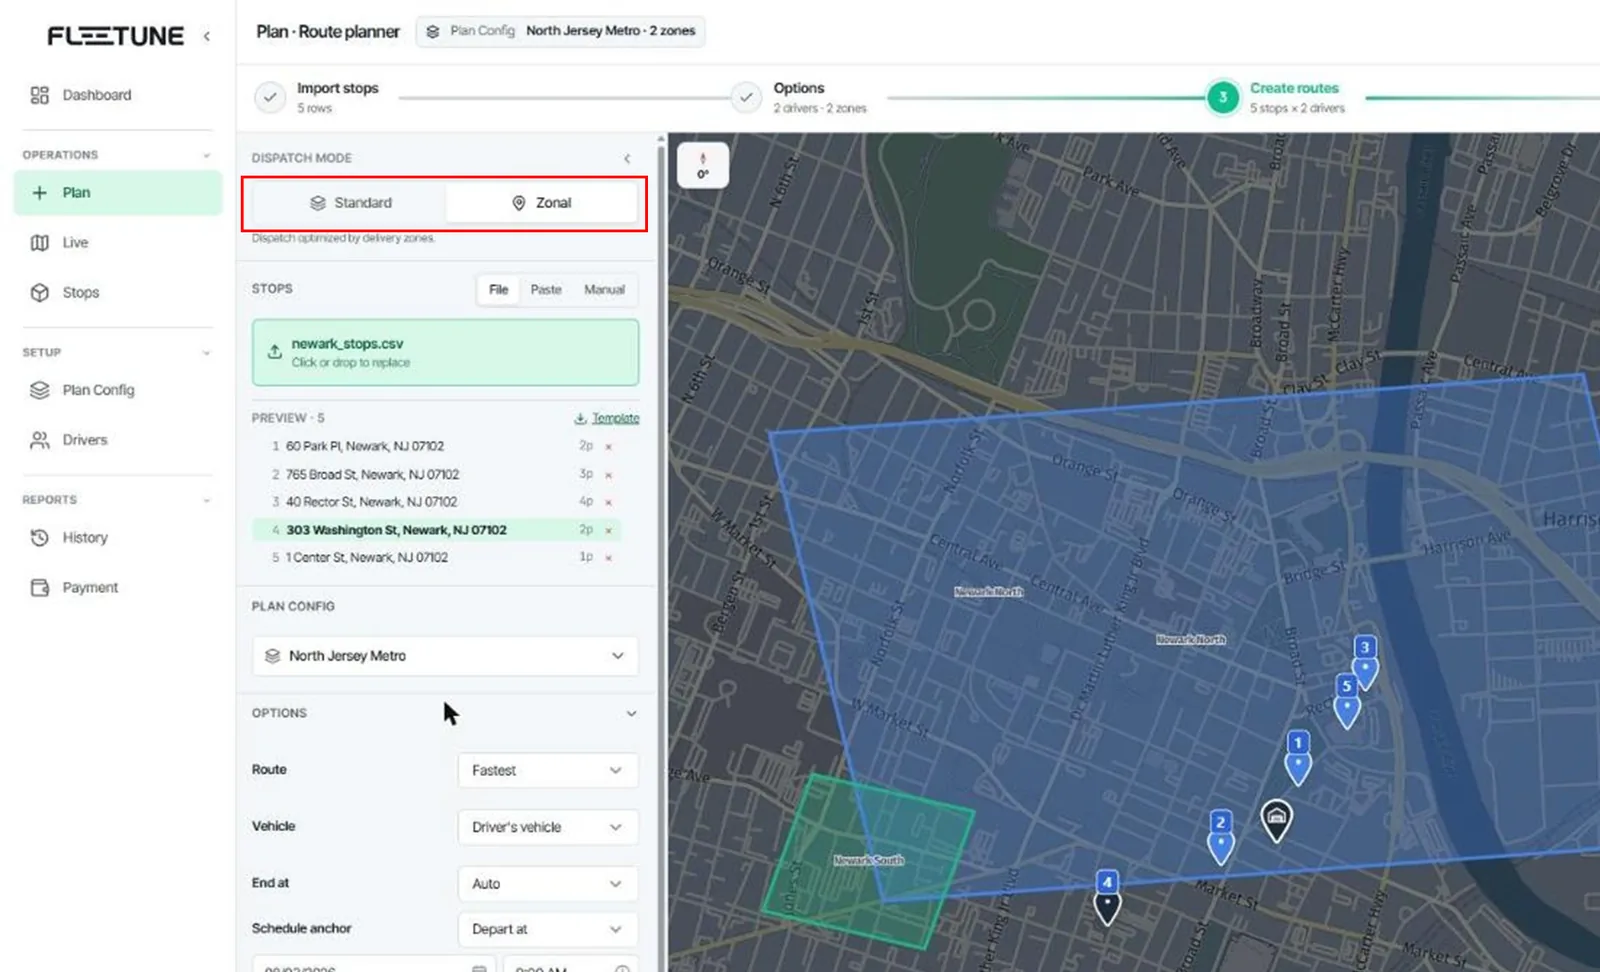
On Plan, set Dispatch mode to Zonal ("Dispatch optimized by delivery zones.").
2
Choose Select Plan Config — only configs that have zone boundaries qualify ("Pick a Plan Config with zone boundaries to run Zonal").
3
Confirm every zone that will receive stops has a driver ("Assign at least 1 driver to a zone").
4
Review Options (same as Standard) and click the dispatch button ("… · {x}/{y} zones assigned"), then Dispatch in the confirmation dialog.
5
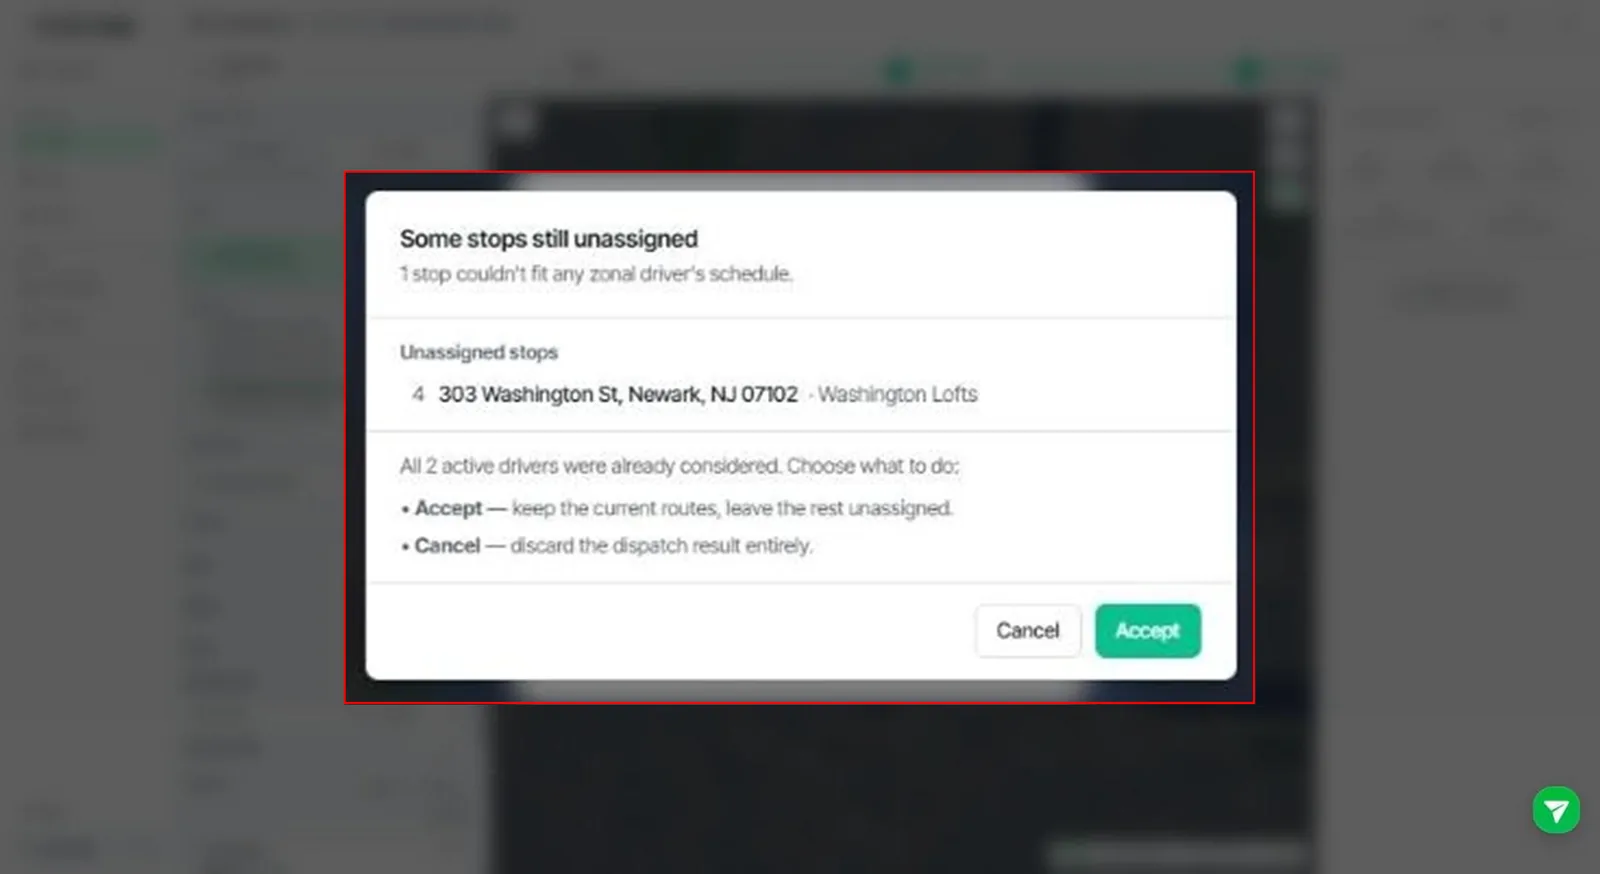
If some stops fall outside all zones, the Some stops still unassigned dialog lists them. Choose:
  • Accept — keep the zone routes and leave those stops unassigned (you can reassign them by hand afterward), or
  • Cancel — discard the whole dispatch result.
Run a Zonal Dispatch — screenshot 1
Run a Zonal Dispatch — screenshot 2
Tip

Zonal keeps drivers in familiar territory day after day — best when your recipients and geography are stable. Use Standard when the stop mix changes daily.

Scenario 9Review Results, Adjust, and Apply (Push to Drivers)

GoalSanity-check the created routes, fix any assignment you disagree with, and publish the routes to the drivers' phones.
WhoDispatcher
Before you startA dispatch result on the Plan screen (Scenario 7 or 8).
1
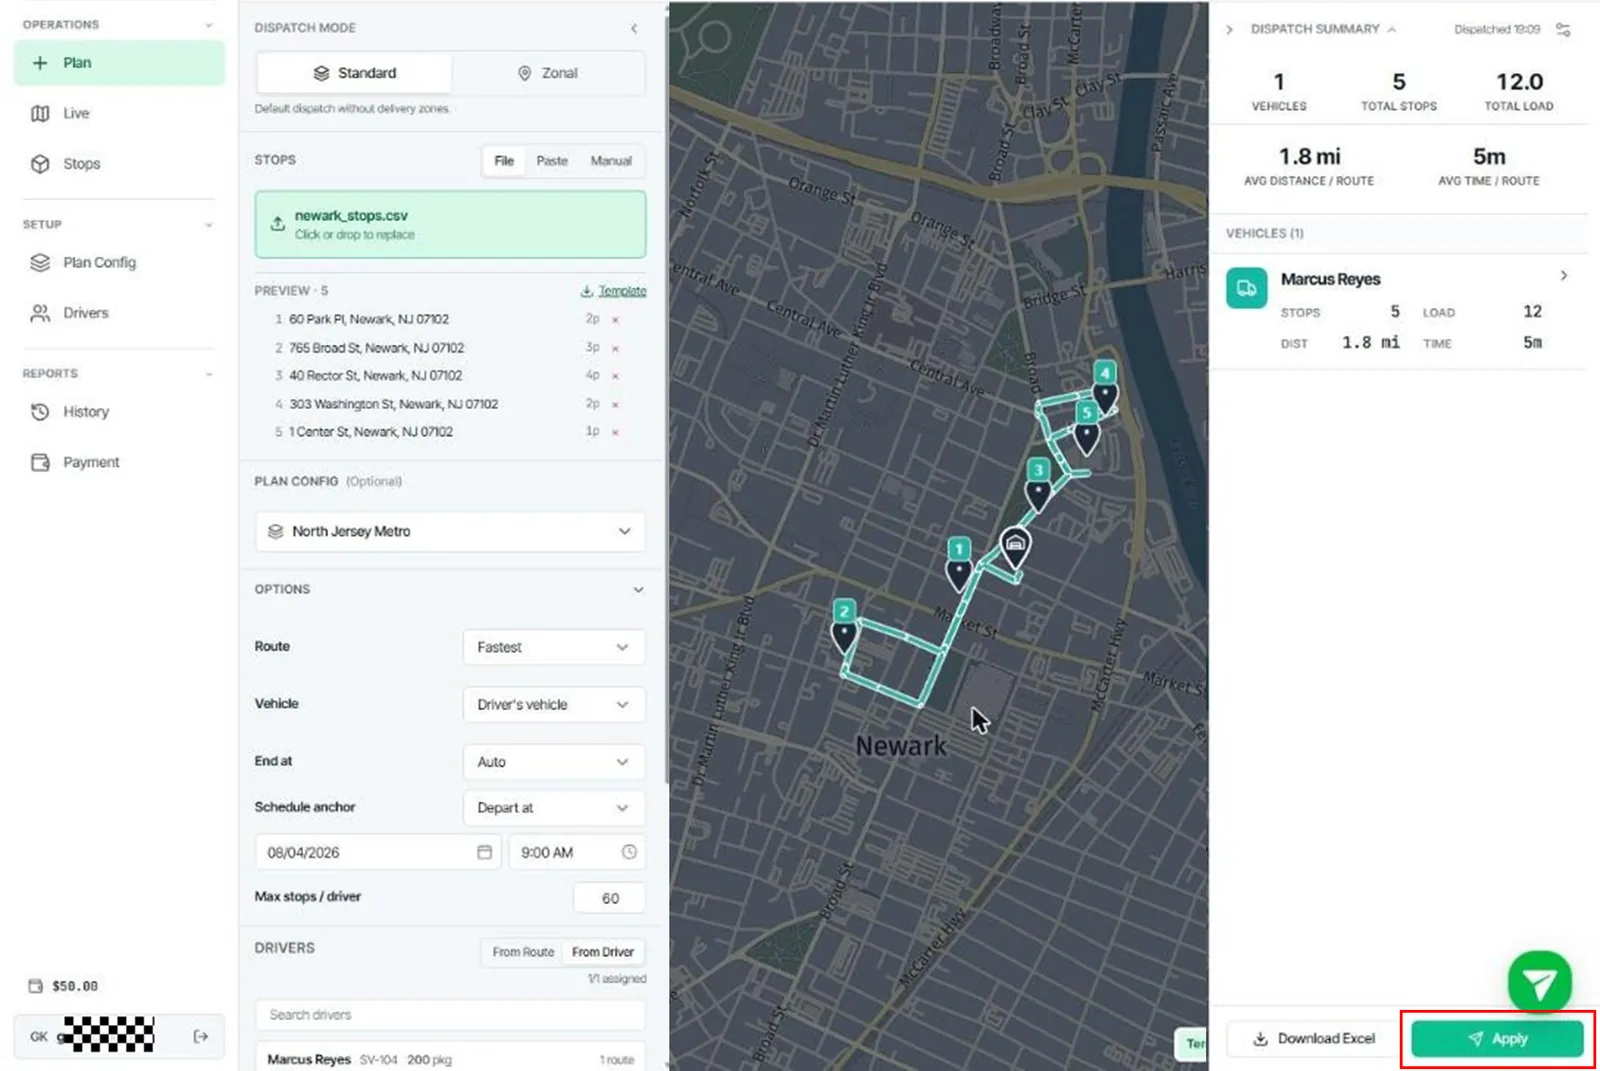
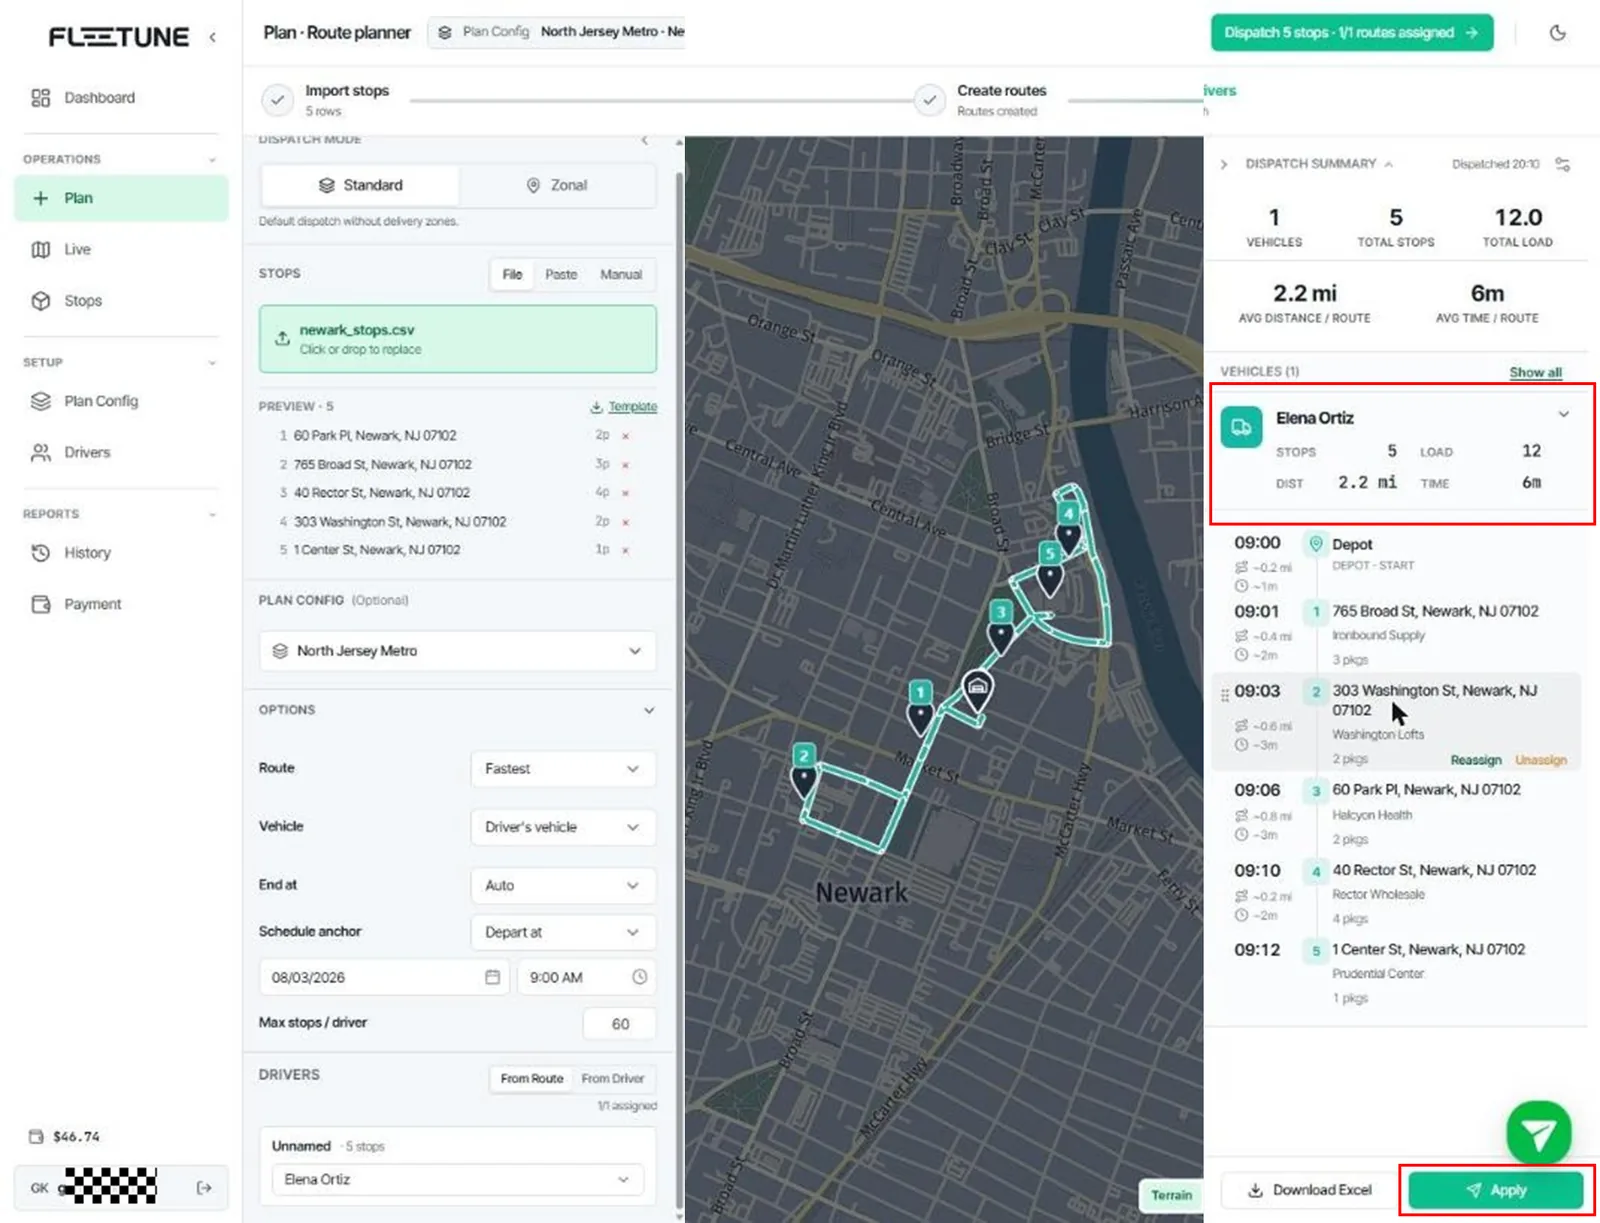
Review the summary bar: Total stops, Total load, Vehicles, Avg distance / route, Avg time / route. Click any route to inspect its stop order on the map; hover a stop for leg distance, drive time and estimated arrival.
2
Adjust if needed — every edit is undoable (Undo last edit / Redo):
  • Drag stops to reorder within a route ("Drag to reorder").
  • Reassign to another driver or Remove from route (move to unassigned) from a stop's menu.
  • Assign to Route for unassigned stops.
3
Optionally click Download Excel to export the plan for your own records.
4
Click Apply. This is the action that:
  • creates the live missions, and
  • sends each assigned driver a push notification ("New route assigned — You have a new route. Open the app to start.").
5
The progress rail shows Pushed to drivers. From here, live monitoring happens in Live and Stops (Part 3).
Review Results, Adjust, and Apply (Push to Drivers) — screenshot 1
Tip

After applying, small changes don't require a re-dispatch: reorder, reassign and cancel are all available on live routes (Scenario 14).

Part 3Running the Day — Live Operations

Scenario 10Monitor Drivers and Missions in Live
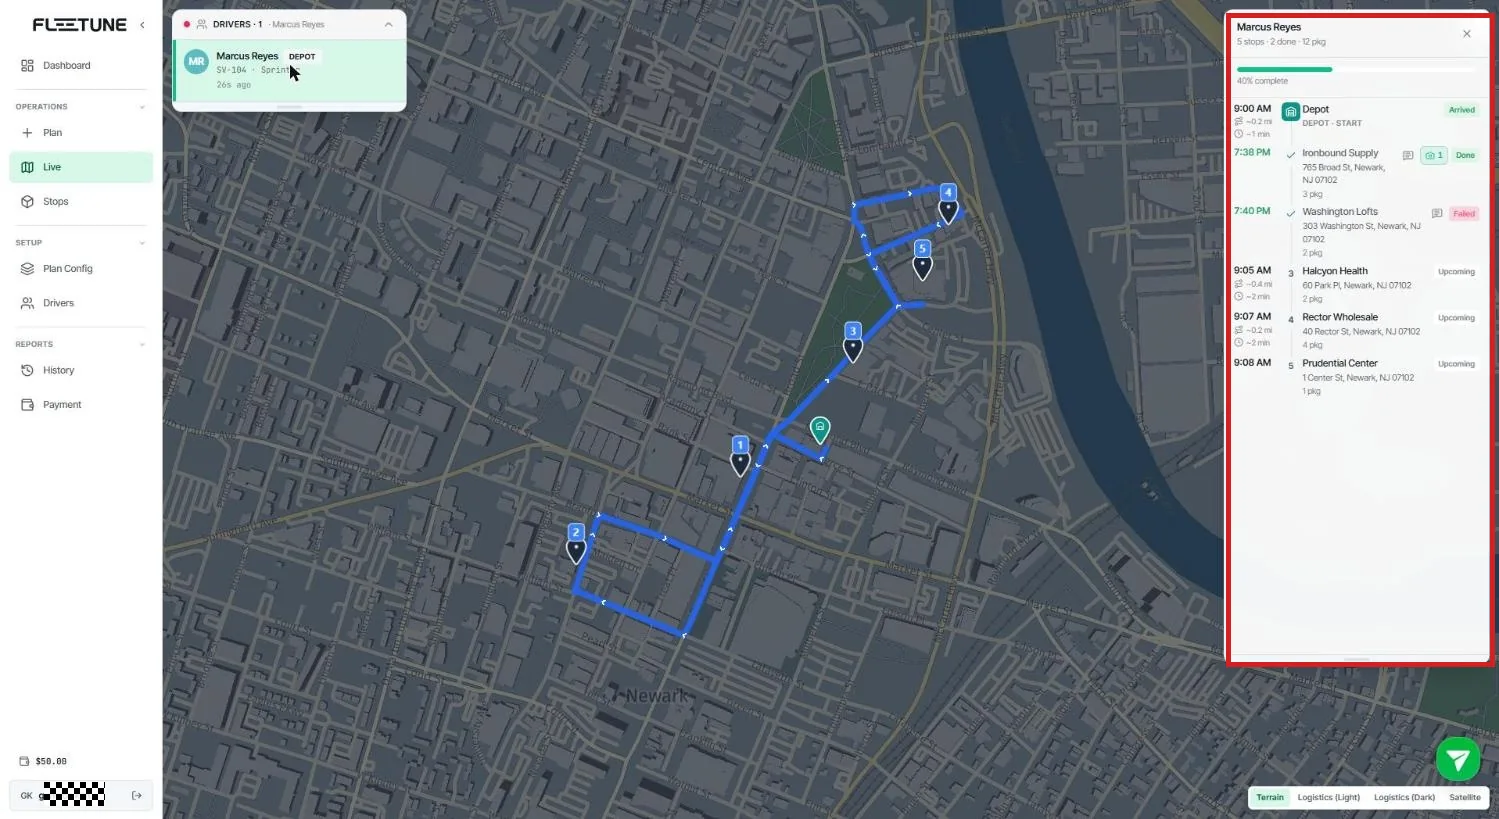
GoalWatch every truck in real time, see where each driver is headed next, and drill into any mission.
WhoDispatcher
Before you startRoutes applied (Scenario 9); drivers signed in with location sharing on.
1
In the sidebar under Operations, open Live.
2
The Drivers list shows every driver with a live status: Online (updated within 3 minutes), "{n} min ago", Offline, or No schedule.
3
Click a driver (in the list or on the map) to focus the map and see the driver's current leg — the path they are driving right now, refreshed every few seconds.
4
Open the Driver mission panel to see route progress (done/total), each stop's estimated arrival, distance and drive time to the next stop, notes, and any stops the driver added themselves ("Added by driver").
5
Read the map pins: planned stops are blue; arrival pins are green (delivered), amber (arrived, proof pending), yellow (skipped), red (failed). Use the layer controls (Routes / Stops / Zones / Labels / Dim / Fit) to declutter.
6
View proof of delivery as it comes in — tap the photo thumbnails or View signature on a completed stop.
Monitor Drivers and Missions in Live — screenshot 1
Note

A driver showing Offline usually means the app lost location permission or the phone's battery saver killed background updates — re-check the permission steps in Scenario 5.

Scenario 11Track Stops Across All Routes (Stops Screen)

GoalMonitor the day from the delivery side — every address across all routes in one list, with problems surfaced first.
WhoDispatcher
Before you startLive routes running.
1
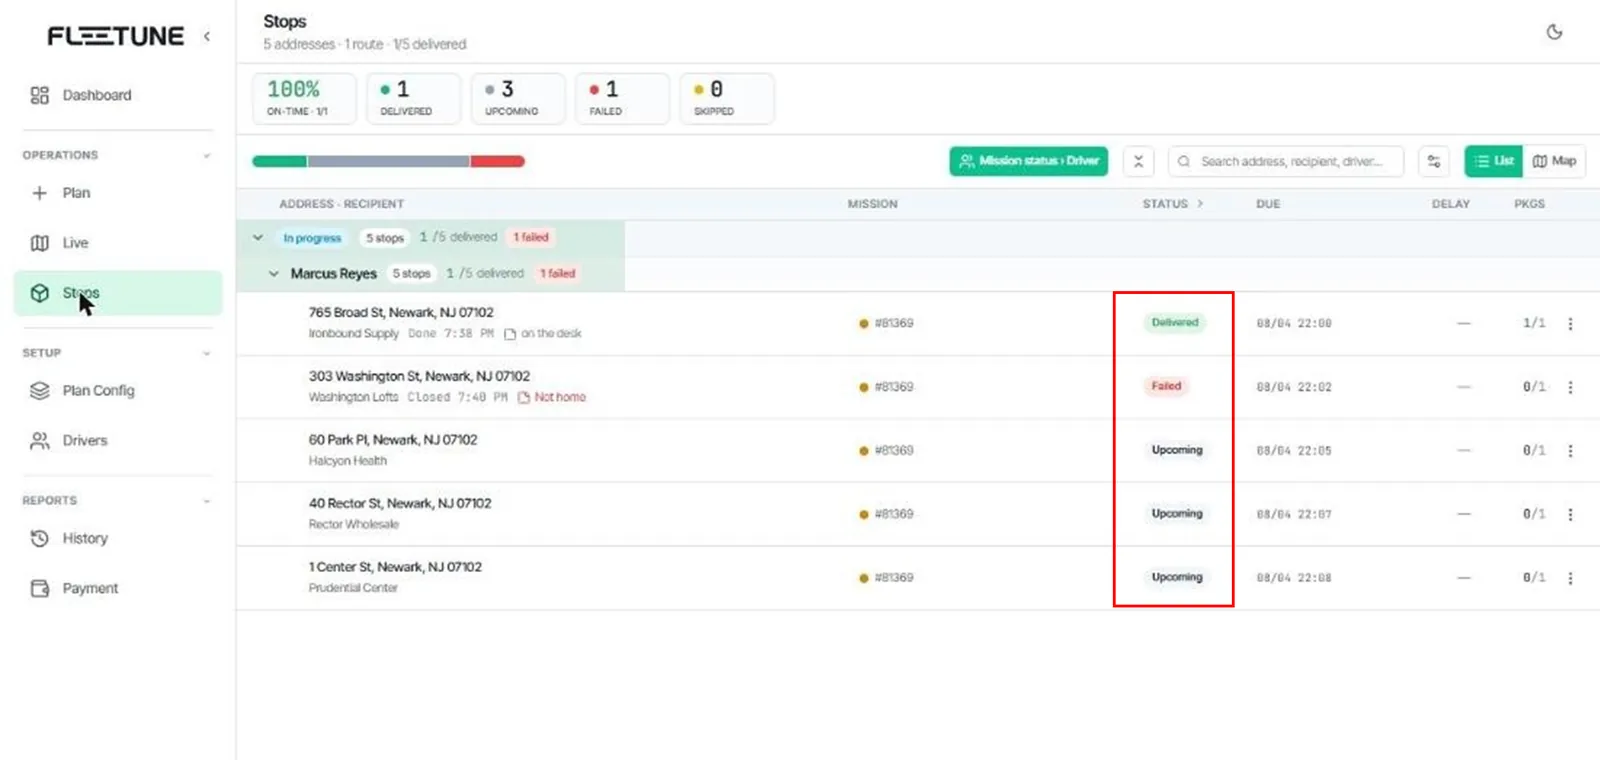
In the sidebar under Operations, open Stops. The subtitle summarizes the day: "{n} addresses · {n} routes · {done}/{total} delivered".
2
Stops flow through three rolling buckets — Upcoming, Active (with a Late counter), Completed. Adjust the window with Window settings (Upcoming lead / Completed lookback).
3
Switch between List and Map view; on the map, toggle Cluster for dense areas.
4
Watch the status vocabulary:
  • Delivered — completed; "Delivered late" (amber) marks an SLA miss.
  • Upcoming — not yet attempted; "Running late / Late" (red) flags at-risk stops in real time.
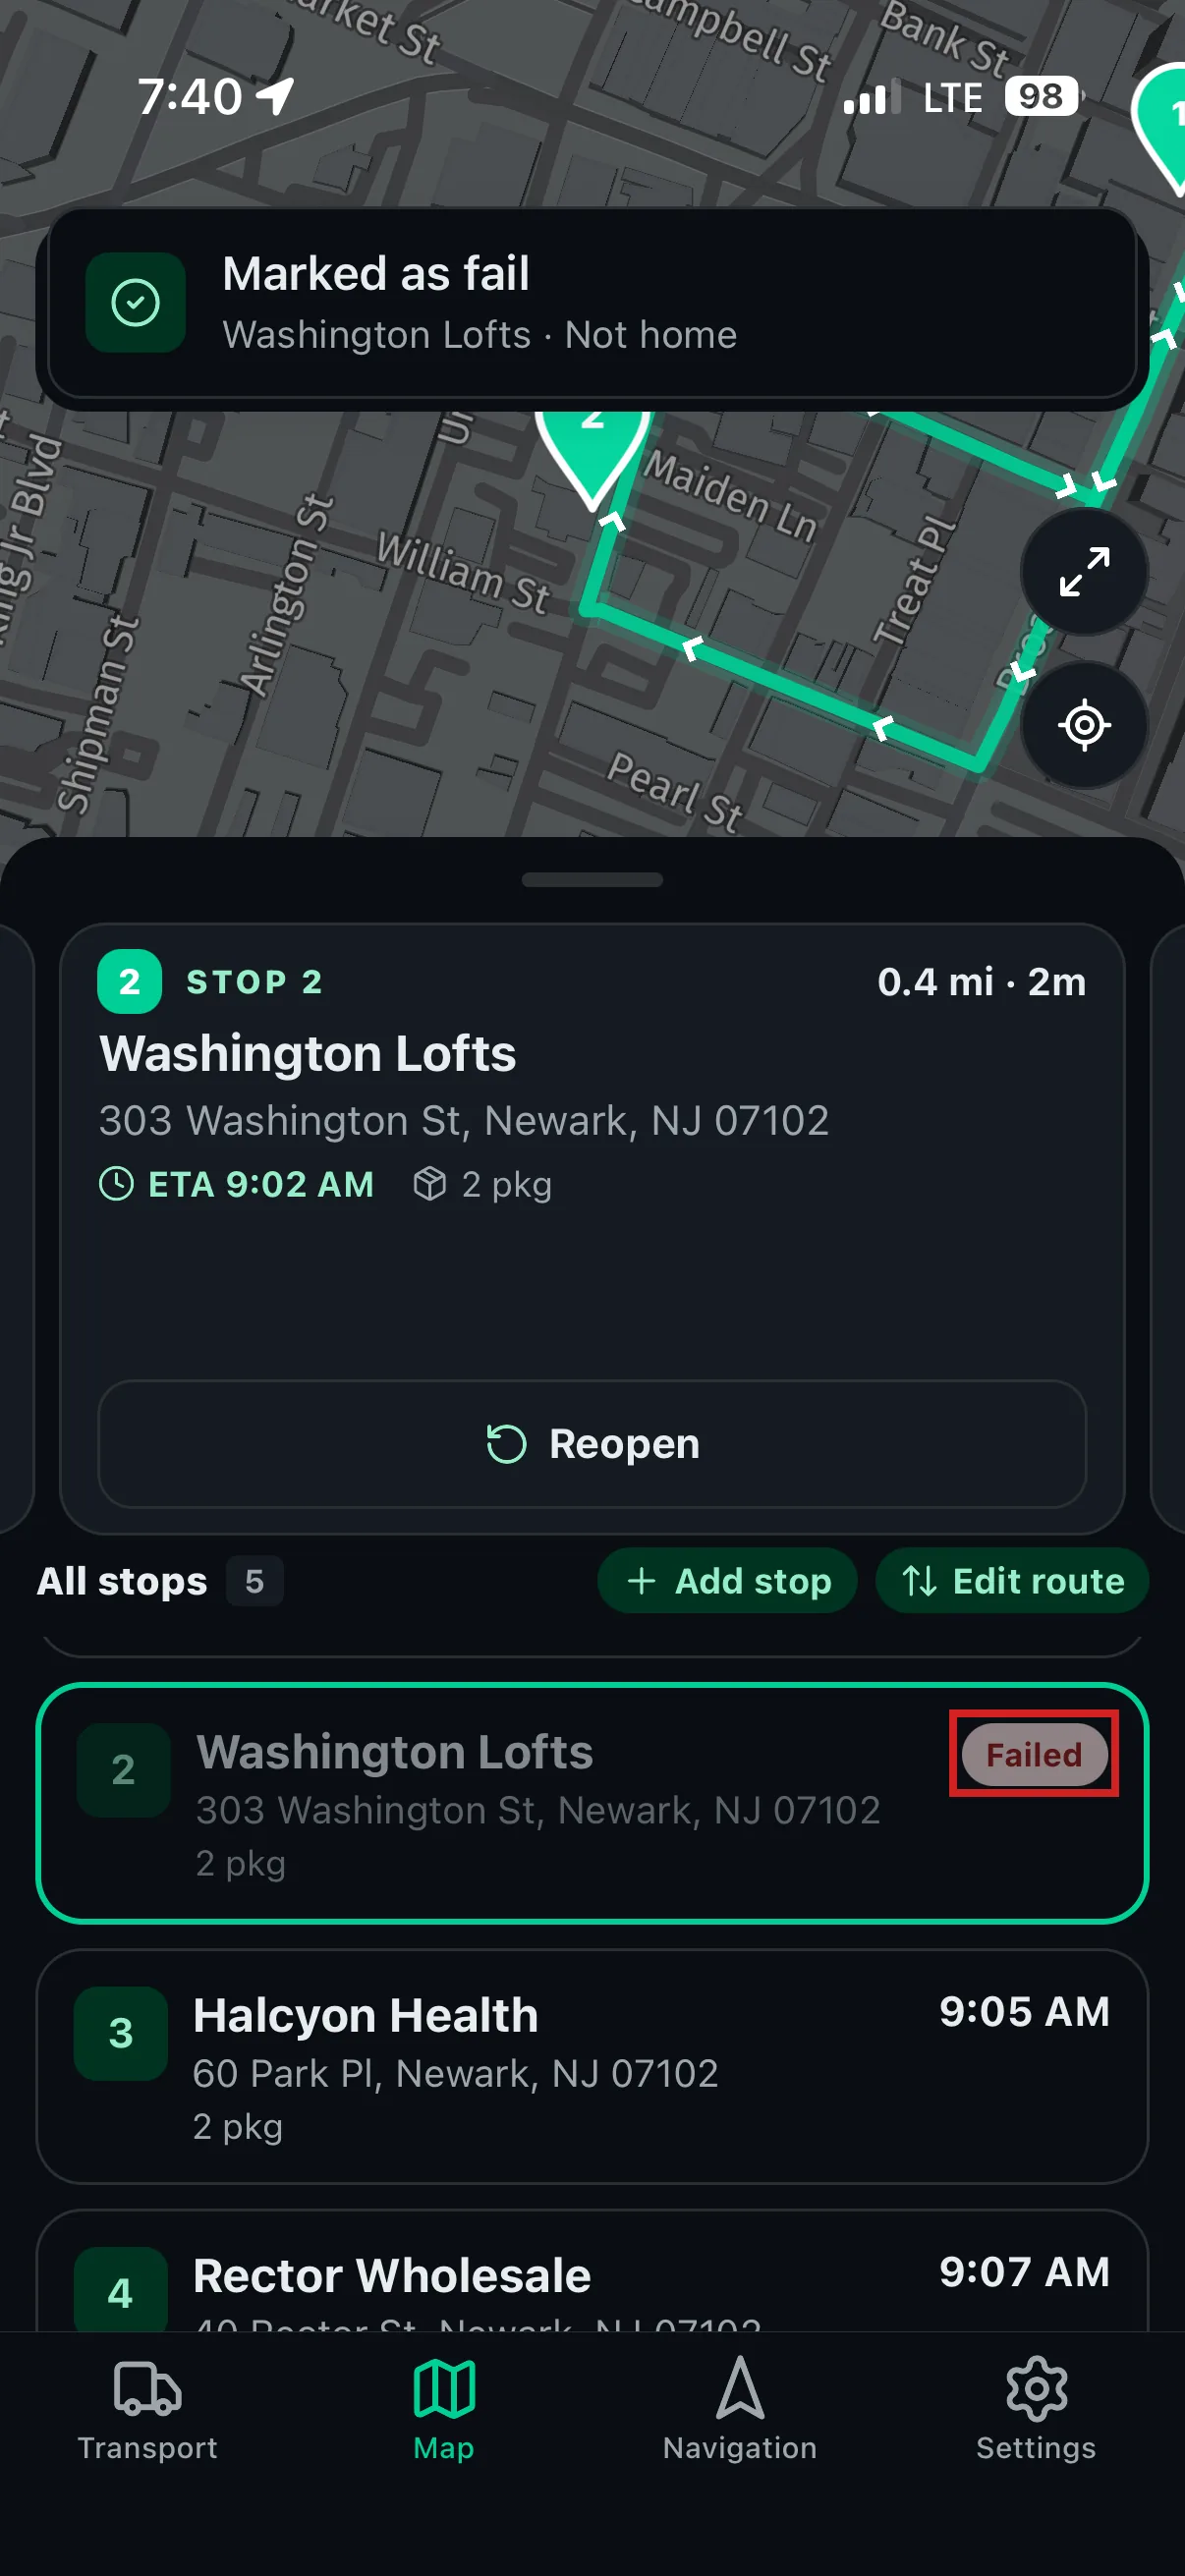
  • Failed — attempted, could not deliver (reason recorded).
  • Skipped — passed over by the driver or dispatcher (reason recorded).
5
Click Open route on any row to open the full Route Detail modal (Scenario 12).
6
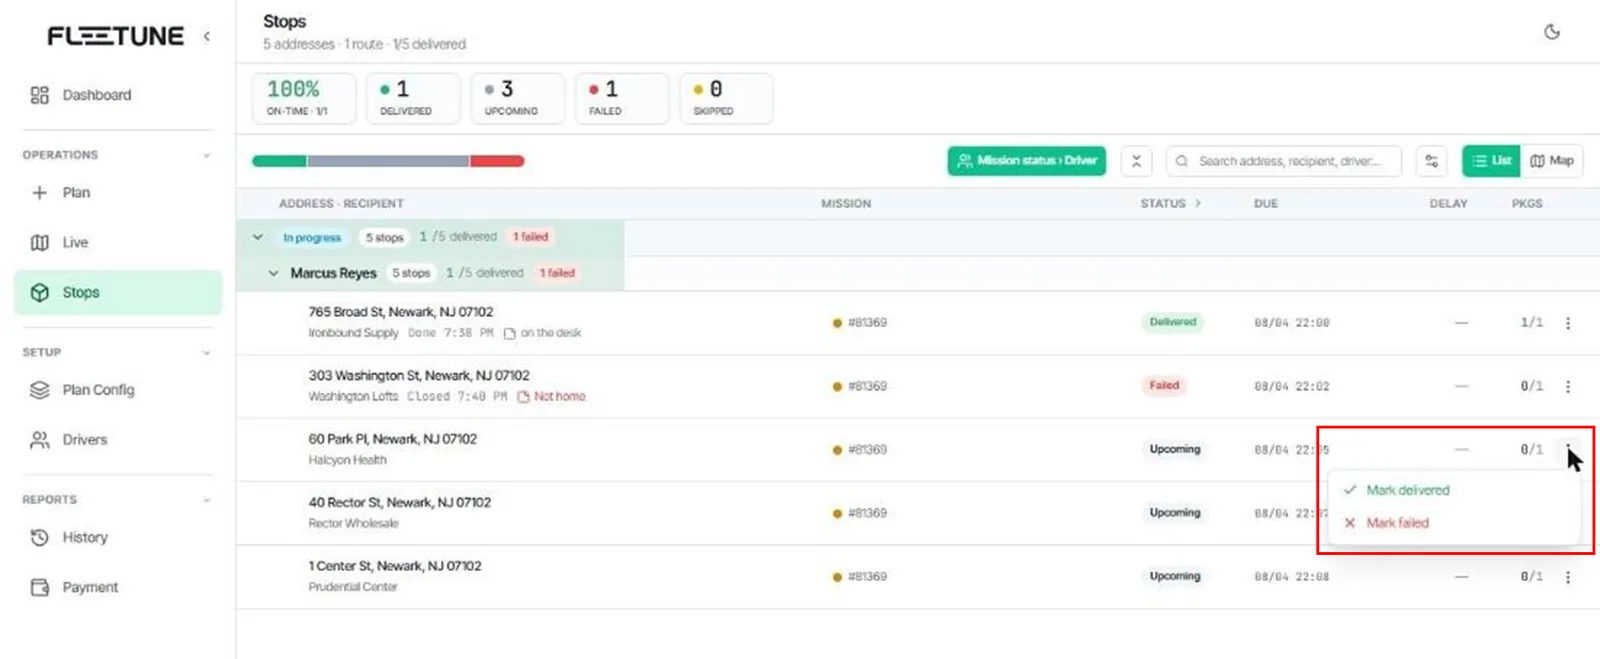
To close out a stop from the office (e.g. the recipient confirmed by phone), open the stop's action menu → Resolve statusConfirm delivered or Confirm failed, with "Delivered by" and an optional note/reason.
Track Stops Across All Routes (Stops Screen) — screenshot 1
Track Stops Across All Routes (Stops Screen) — screenshot 2
Tip

"Hide completed deliveries" keeps the list focused on what still needs attention; the Dashboard's "Needs attention" panel (Scenario 16) is the cross-day version of the same idea.

Scenario 12Share a Tracking Link with a Recipient
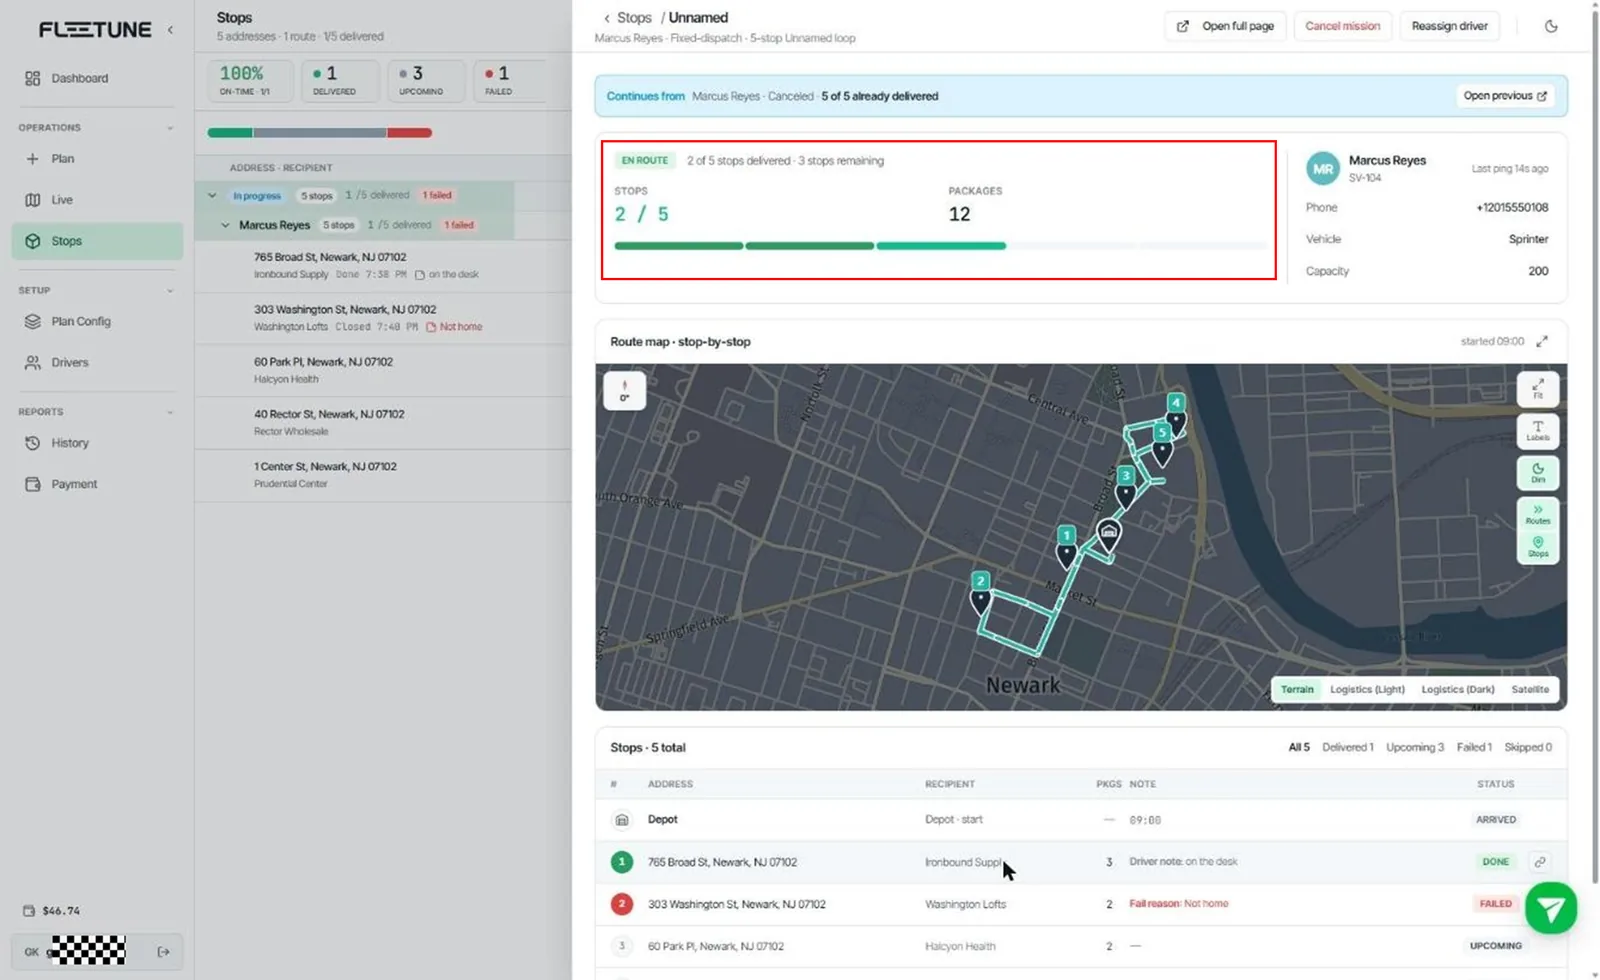
GoalGive a recipient a live, no-login tracking page for their own delivery.
WhoDispatcher
Before you startLive route containing the recipient's stop.
1
Open the route (from Stops, Live, or History) to show Route Detail.
2
On the recipient's stop row, click Copy tracking link — the toast "Tracking link copied" confirms.
3
Send the link to the recipient (text, email, your OMS — any channel).
4
The recipient sees: a live map with the truck's position, an Estimated arrival card, a Delivery progress stepper (Scheduled → On the way → Delivered), and after completion the Proof of delivery photo if one was taken.
Share a Tracking Link with a Recipient — screenshot 1
Note

The tracking page only ever shows that recipient's own stop and coarse delivery states (upcoming / delivered / failed / skipped) — internal operational detail is never exposed. Links expire after the delivery is closed out.

Scenario 13Driver App — Running a Route

GoalThe driver's end-to-end day: receive the route, drive stop by stop, capture proof, and handle exceptions.
WhoDriver
Before you startSigned in and permissioned (Scenario 5); route applied by dispatcher.

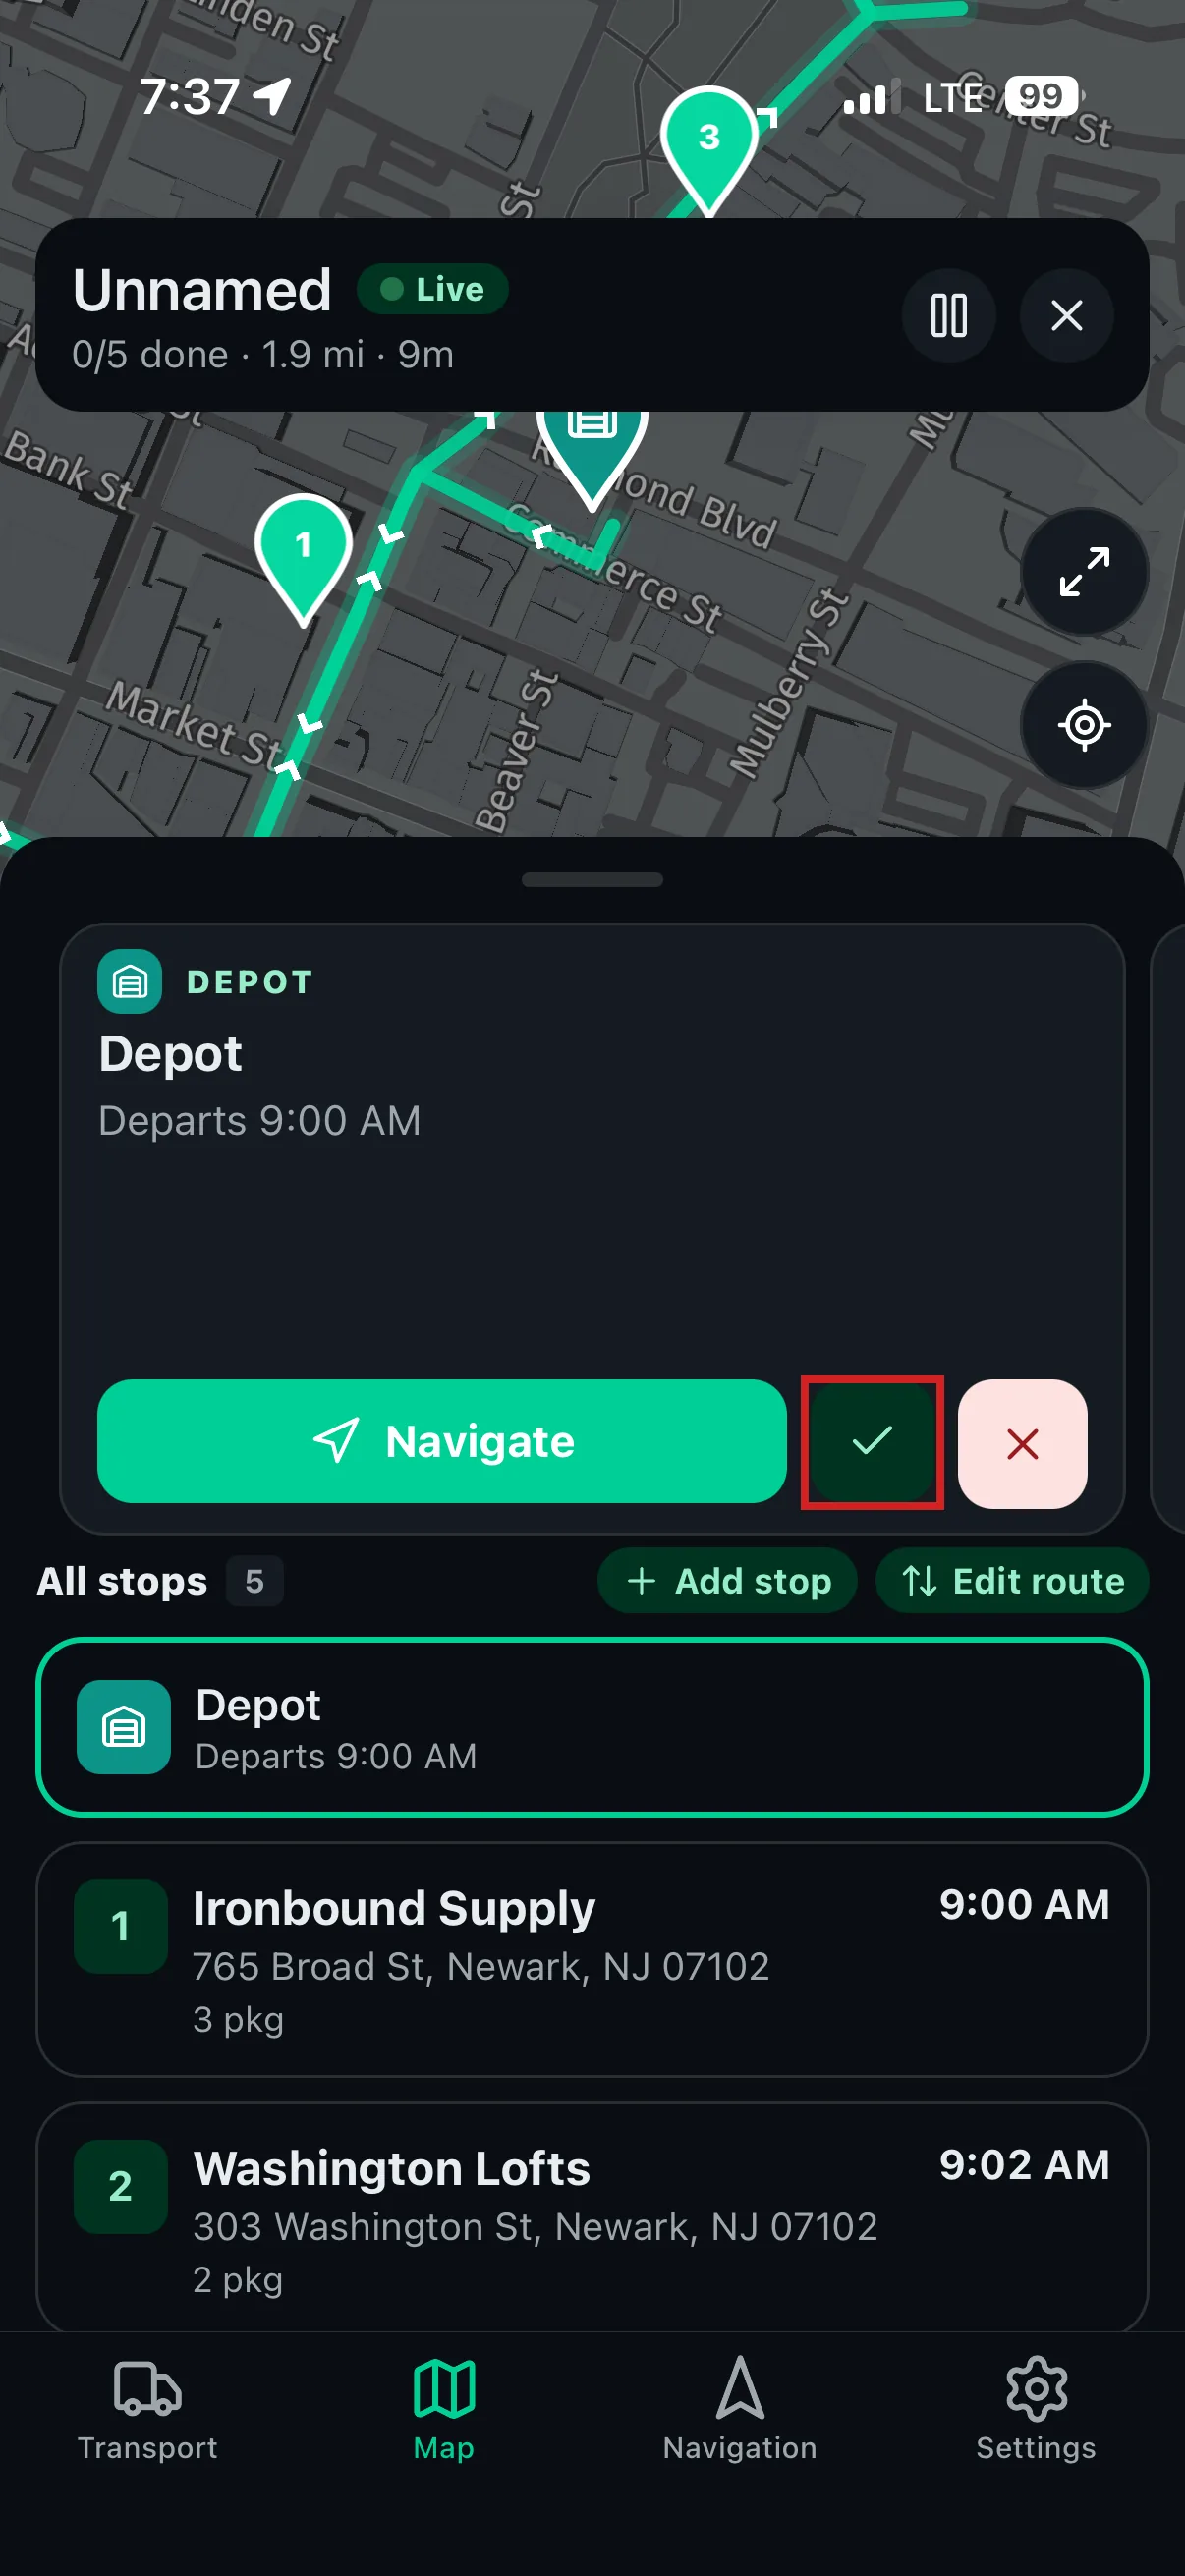
1. Receive — the phone gets the push "New route assigned". Open the app: the route card on the Transport tab shows stops, distance and estimated time. Tap View route.

2. Start — on the Map tab, review the NEXT STOP card and the All stops list, then tap Start driving.

3. Navigate — tap Navigate to open the stop in your chosen navigation app (Google Maps / Apple Maps / Waze). Drive.

4. Arrive — tap Mark arrived (or let Auto-arrival open the confirmation automatically near the address).

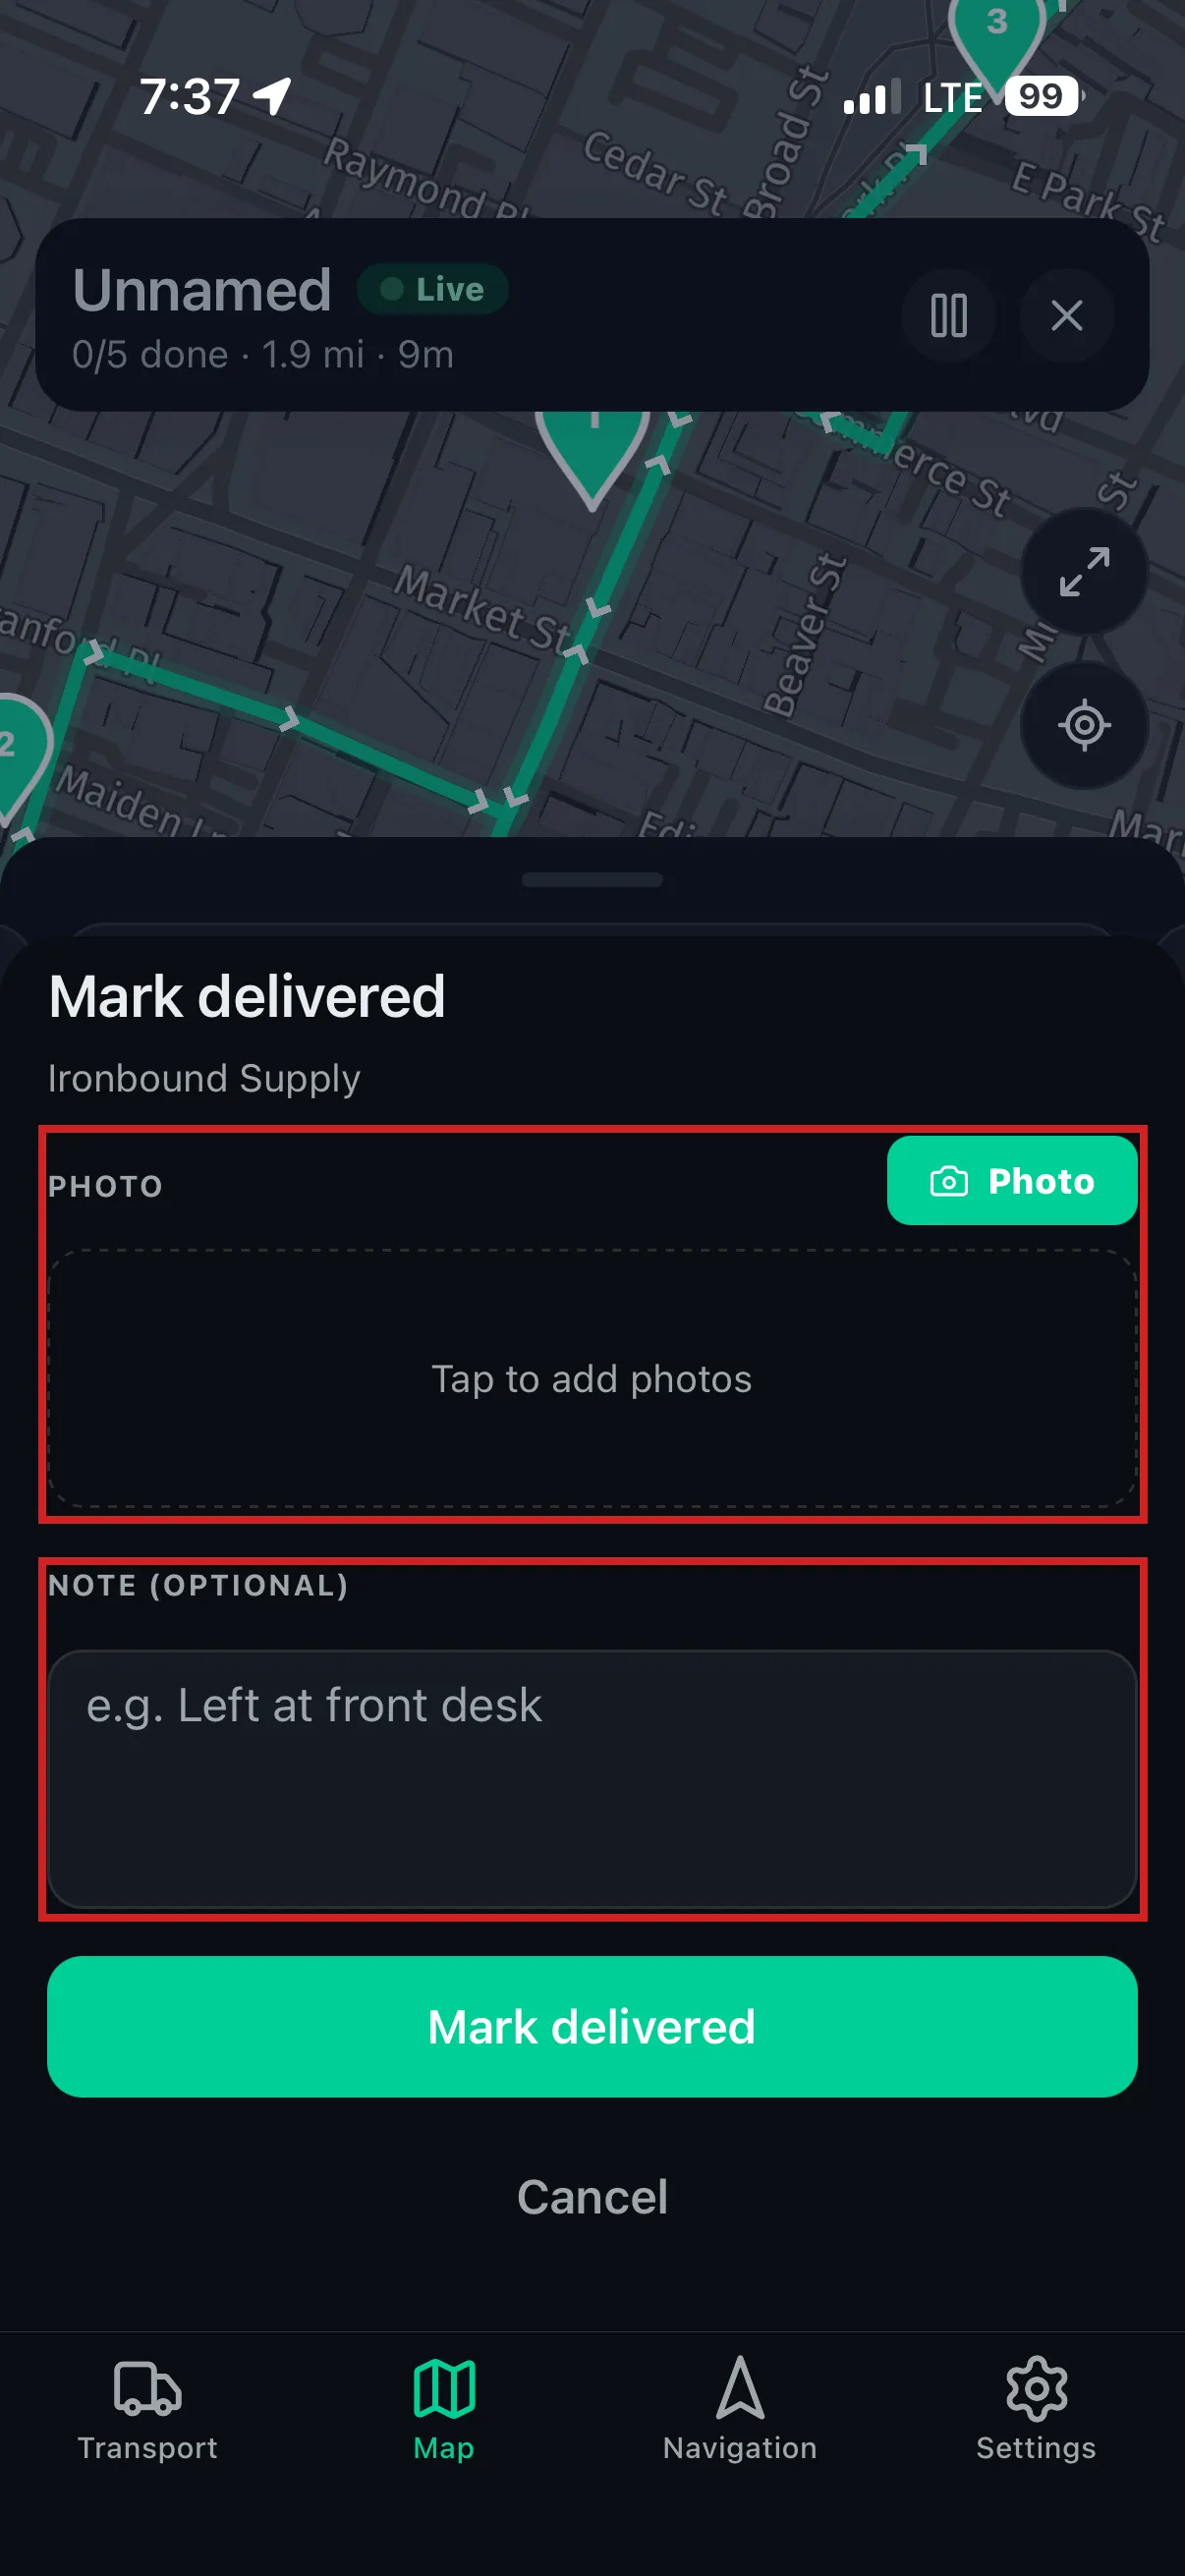
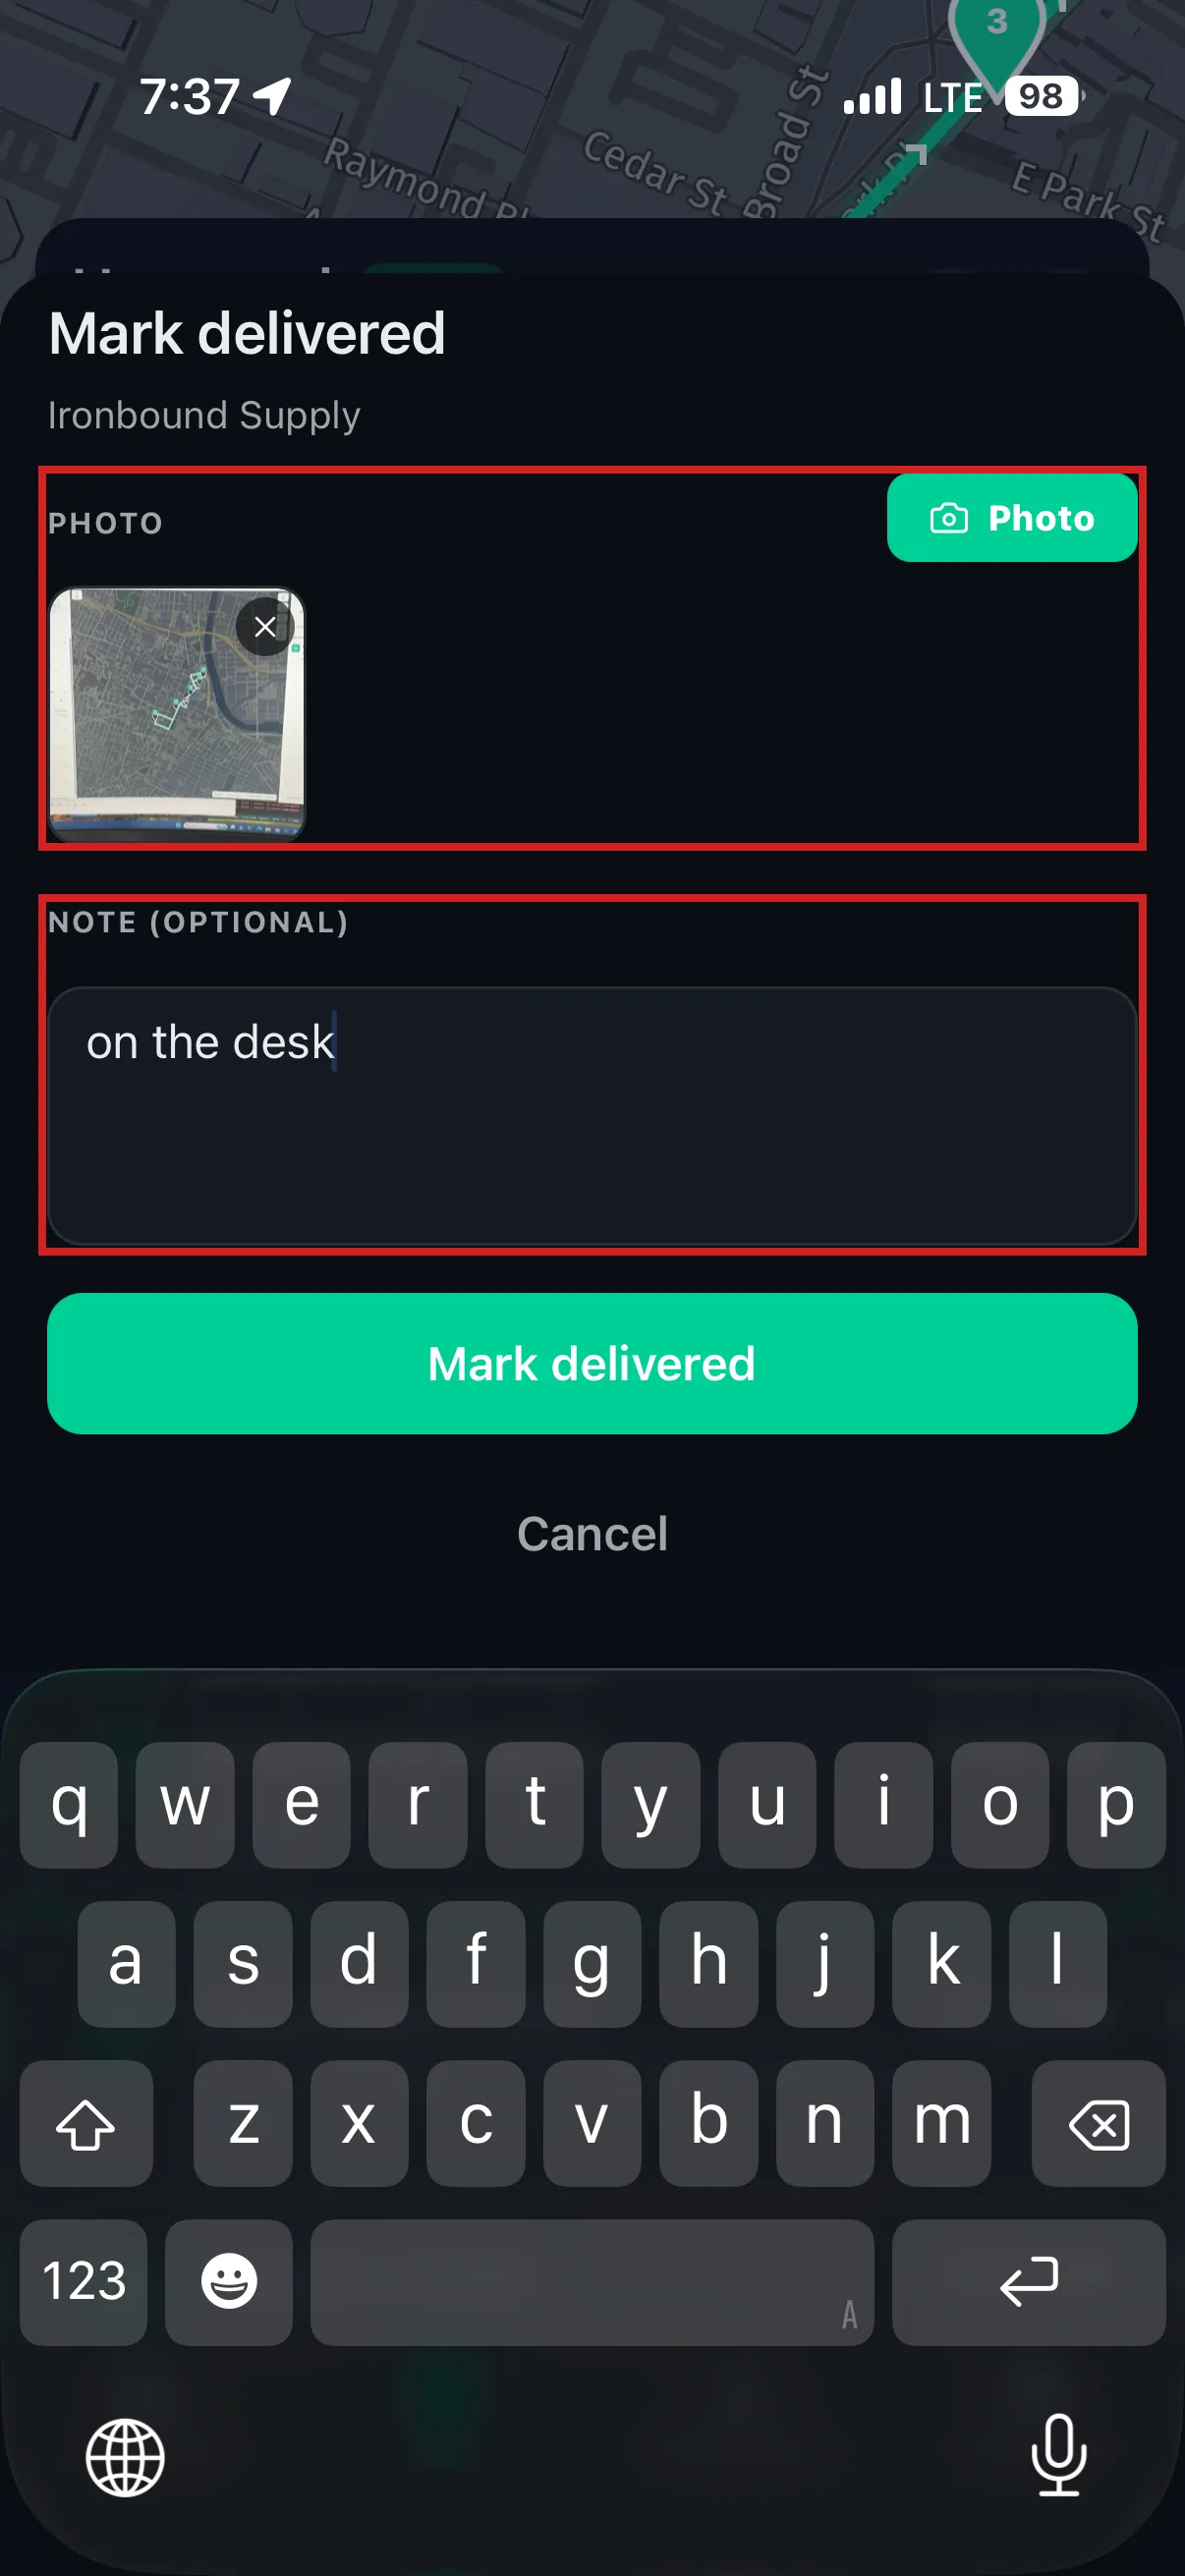
5. Prove — the Proof of Delivery sheet offers PHOTO (capture one or more delivery photos) and/or SIGNATURE (recipient signs on screen; "Signature waived" / "Signature refused by recipient" are recorded options). Add an optional note and tap Submit.

6. Complete — tap Mark Delivered. If several packages share one address, "DELIVERIES AT THIS LOCATION" groups them and All delivered here closes them in one action. The app advances to the next stop (and auto-opens navigation if the driver enabled it).

7. Exceptions:

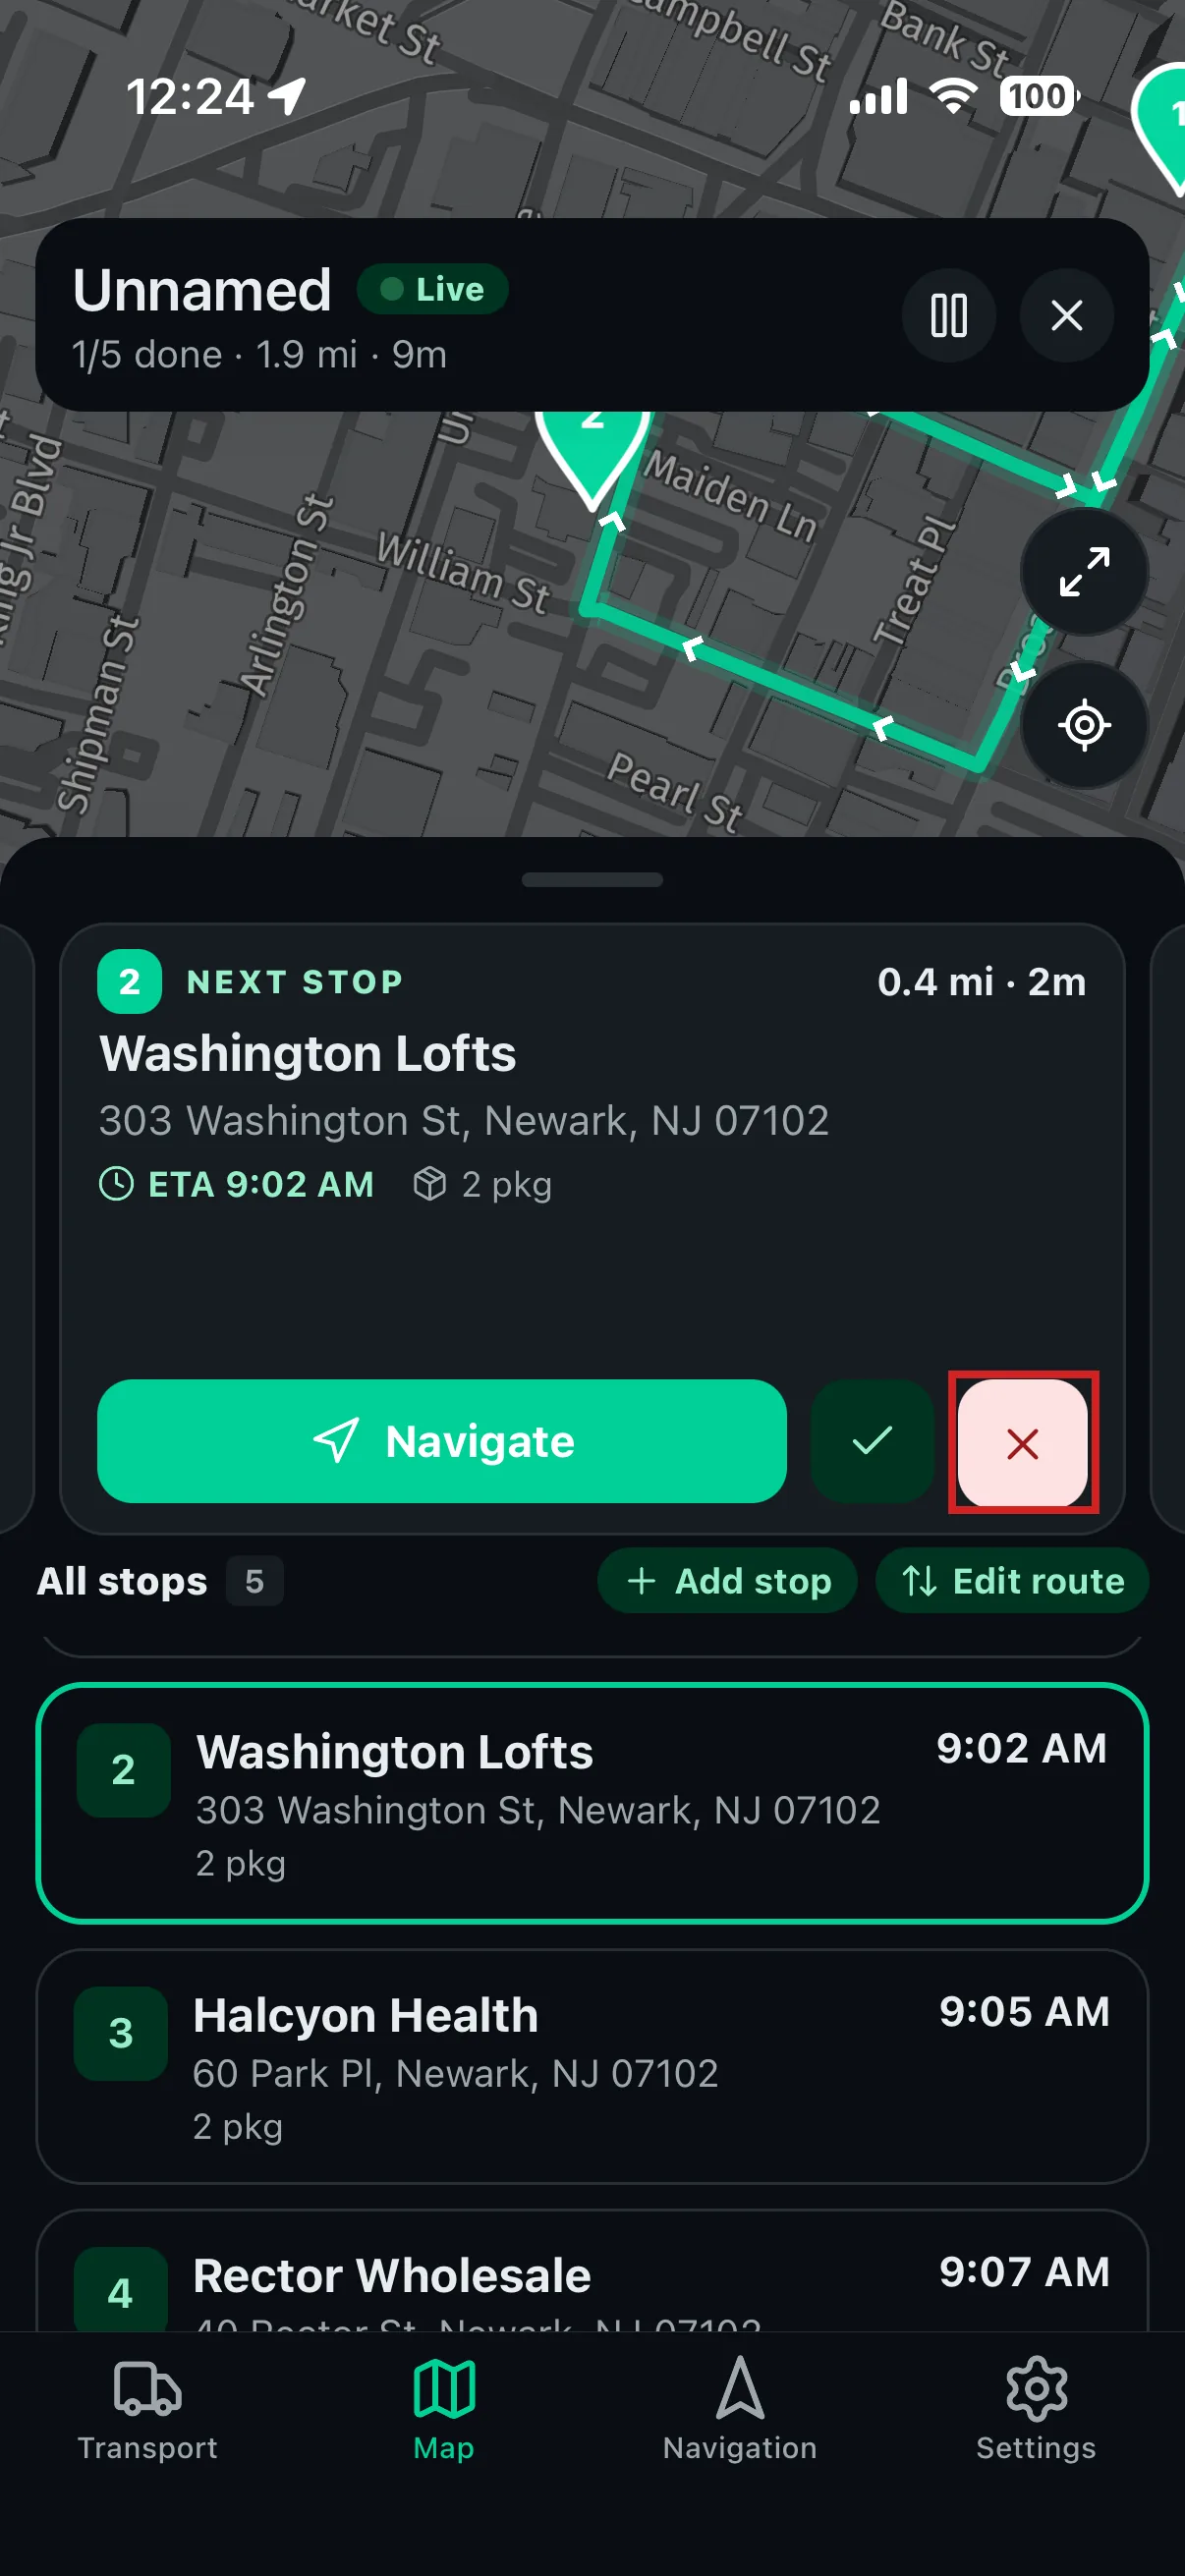
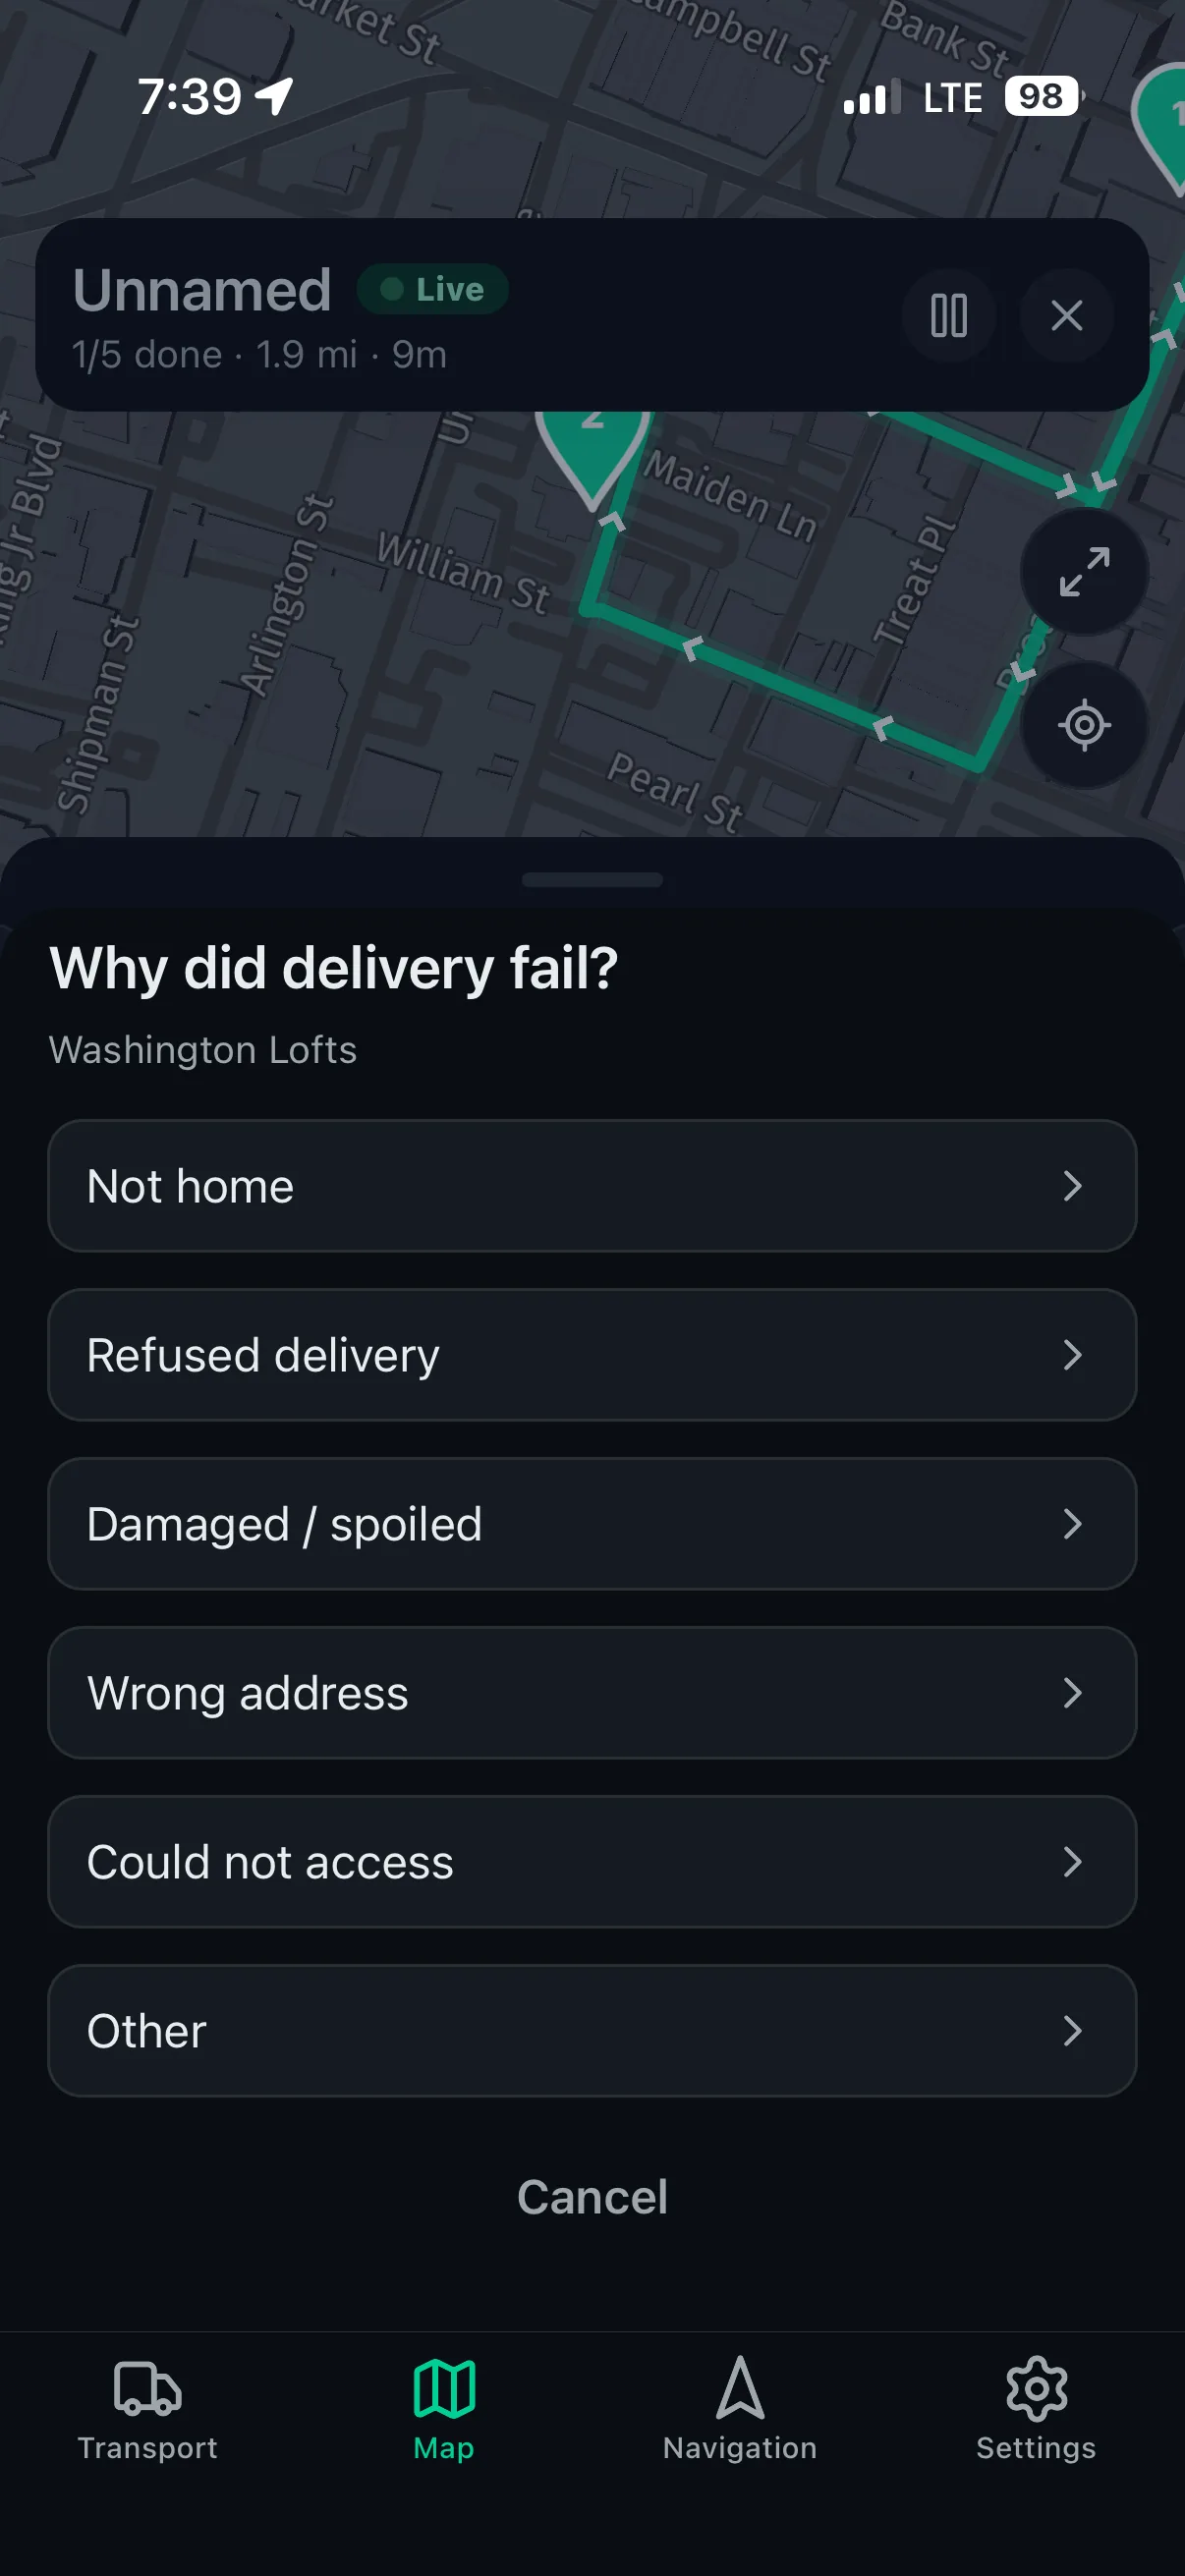
  • Mark failed — choose a reason: Not home, Refused delivery, Damaged / spoiled, Wrong address, Could not access, Other.
  • Skip a stop — in Edit route → Reorder, use Skip stop with a reason (Return later, Business closed, Could not access, Other). Reopen later with Reopen stop.
  • Add a stopEdit route → Add stop: type the address or drop a pin, set packages and proof requirements, Add to list. The route and ETA recalculate.
  • Reorder — drag stops in Edit route → Reorder; distance and ETA update.

8. Finish — after the last stop the route shows Route complete / End of route (returning to Depot or Garage if the route was planned that way). The route moves to the Completed tab.
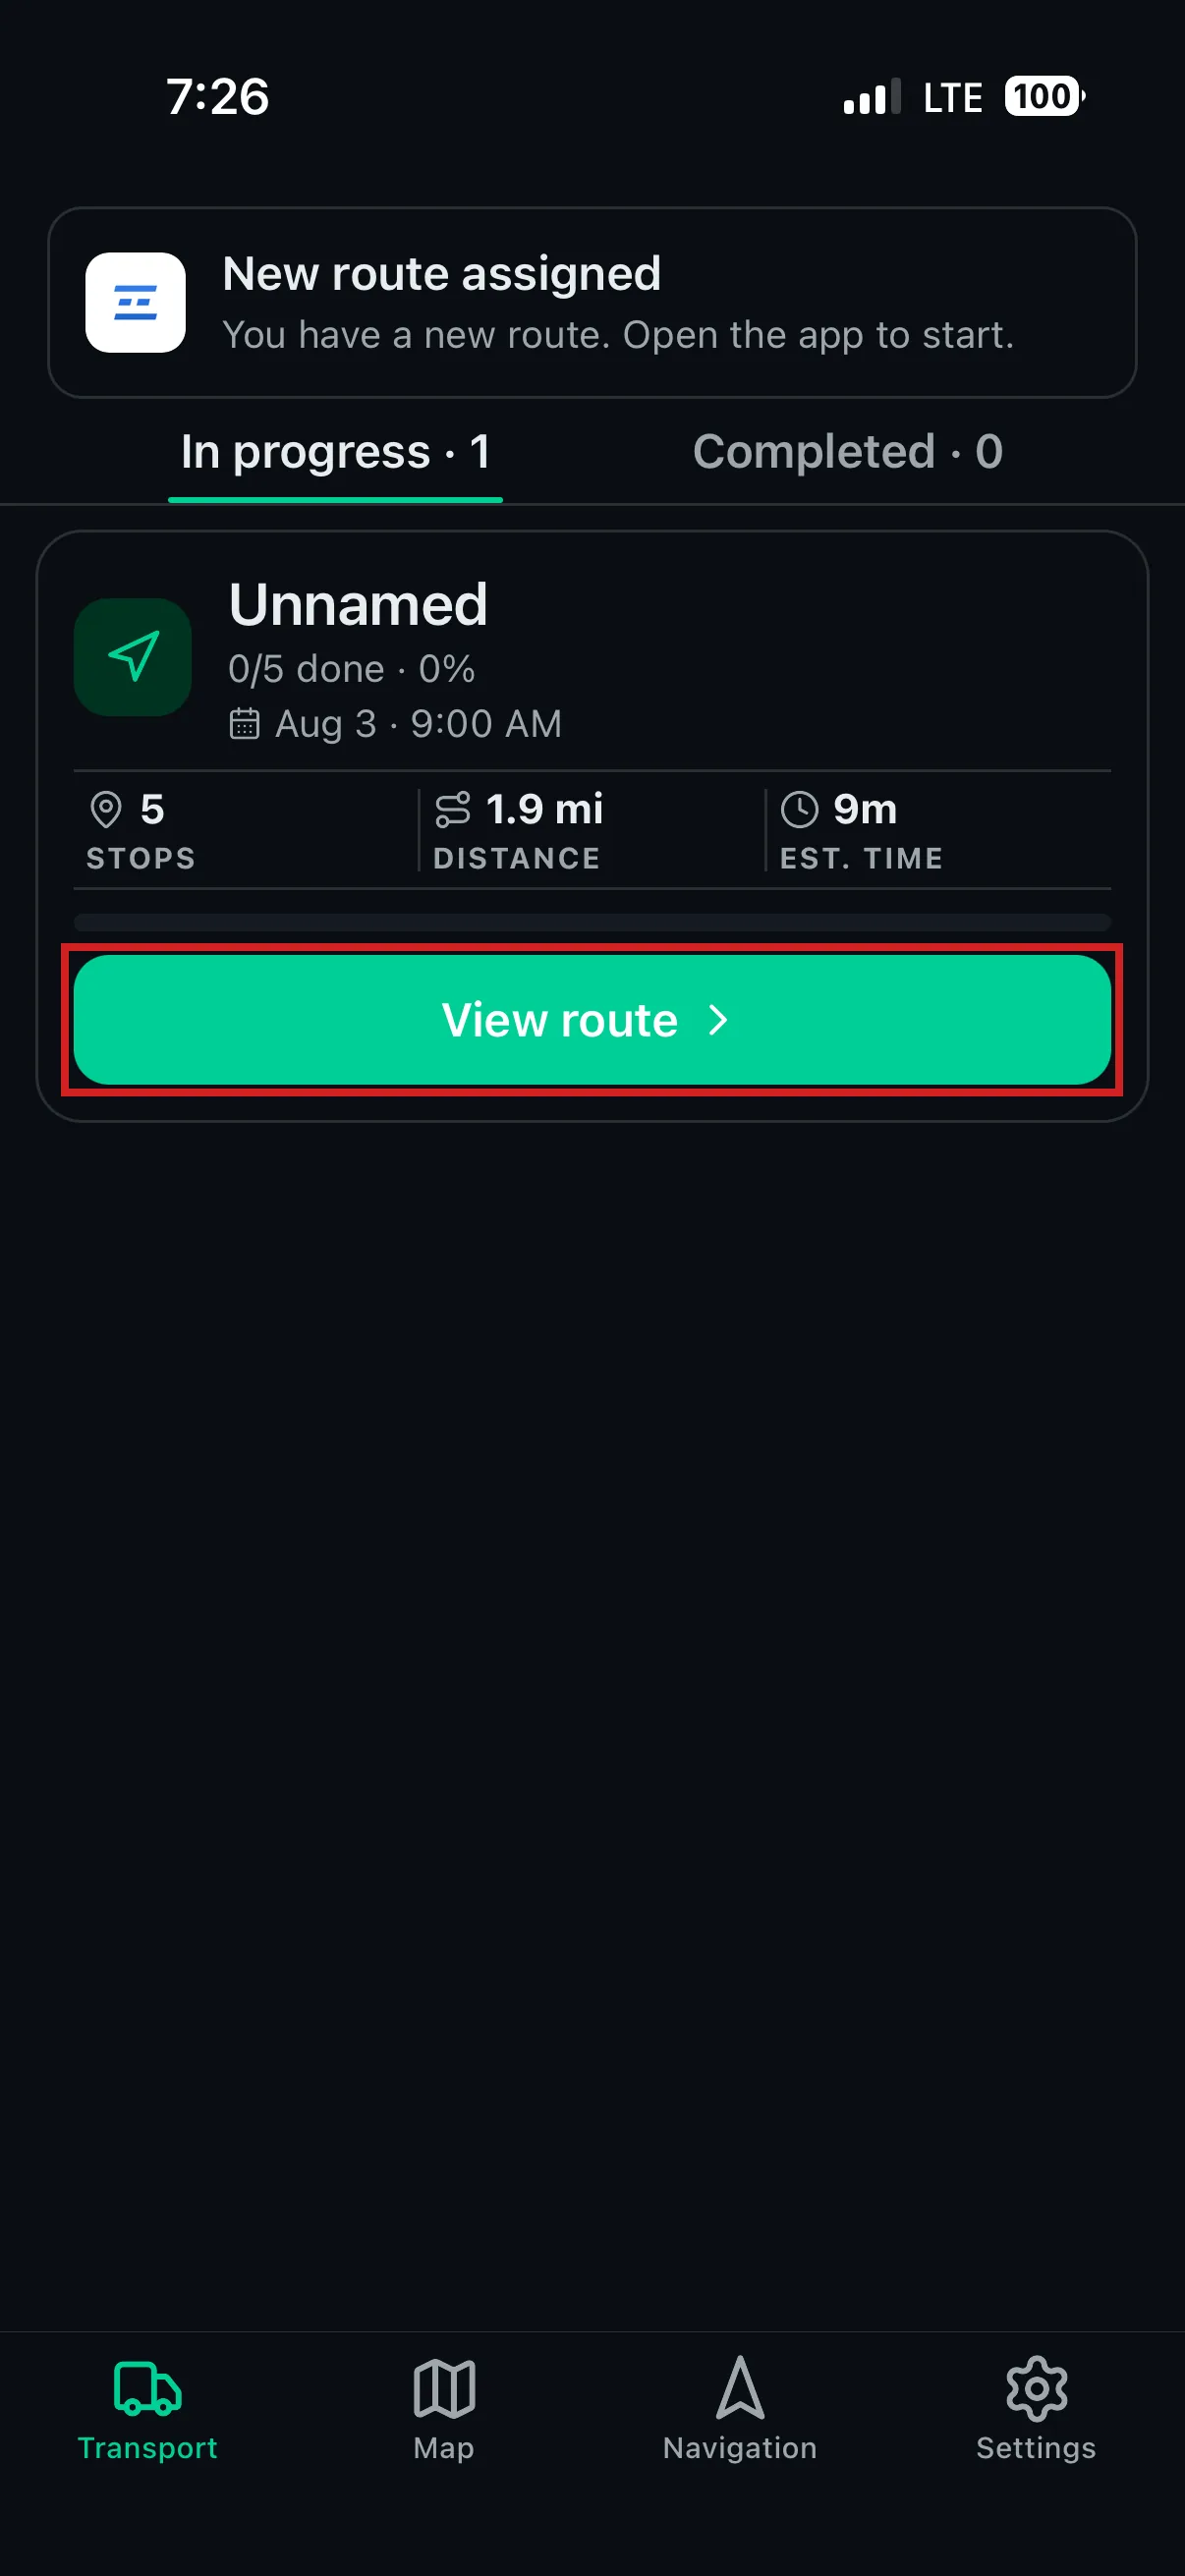
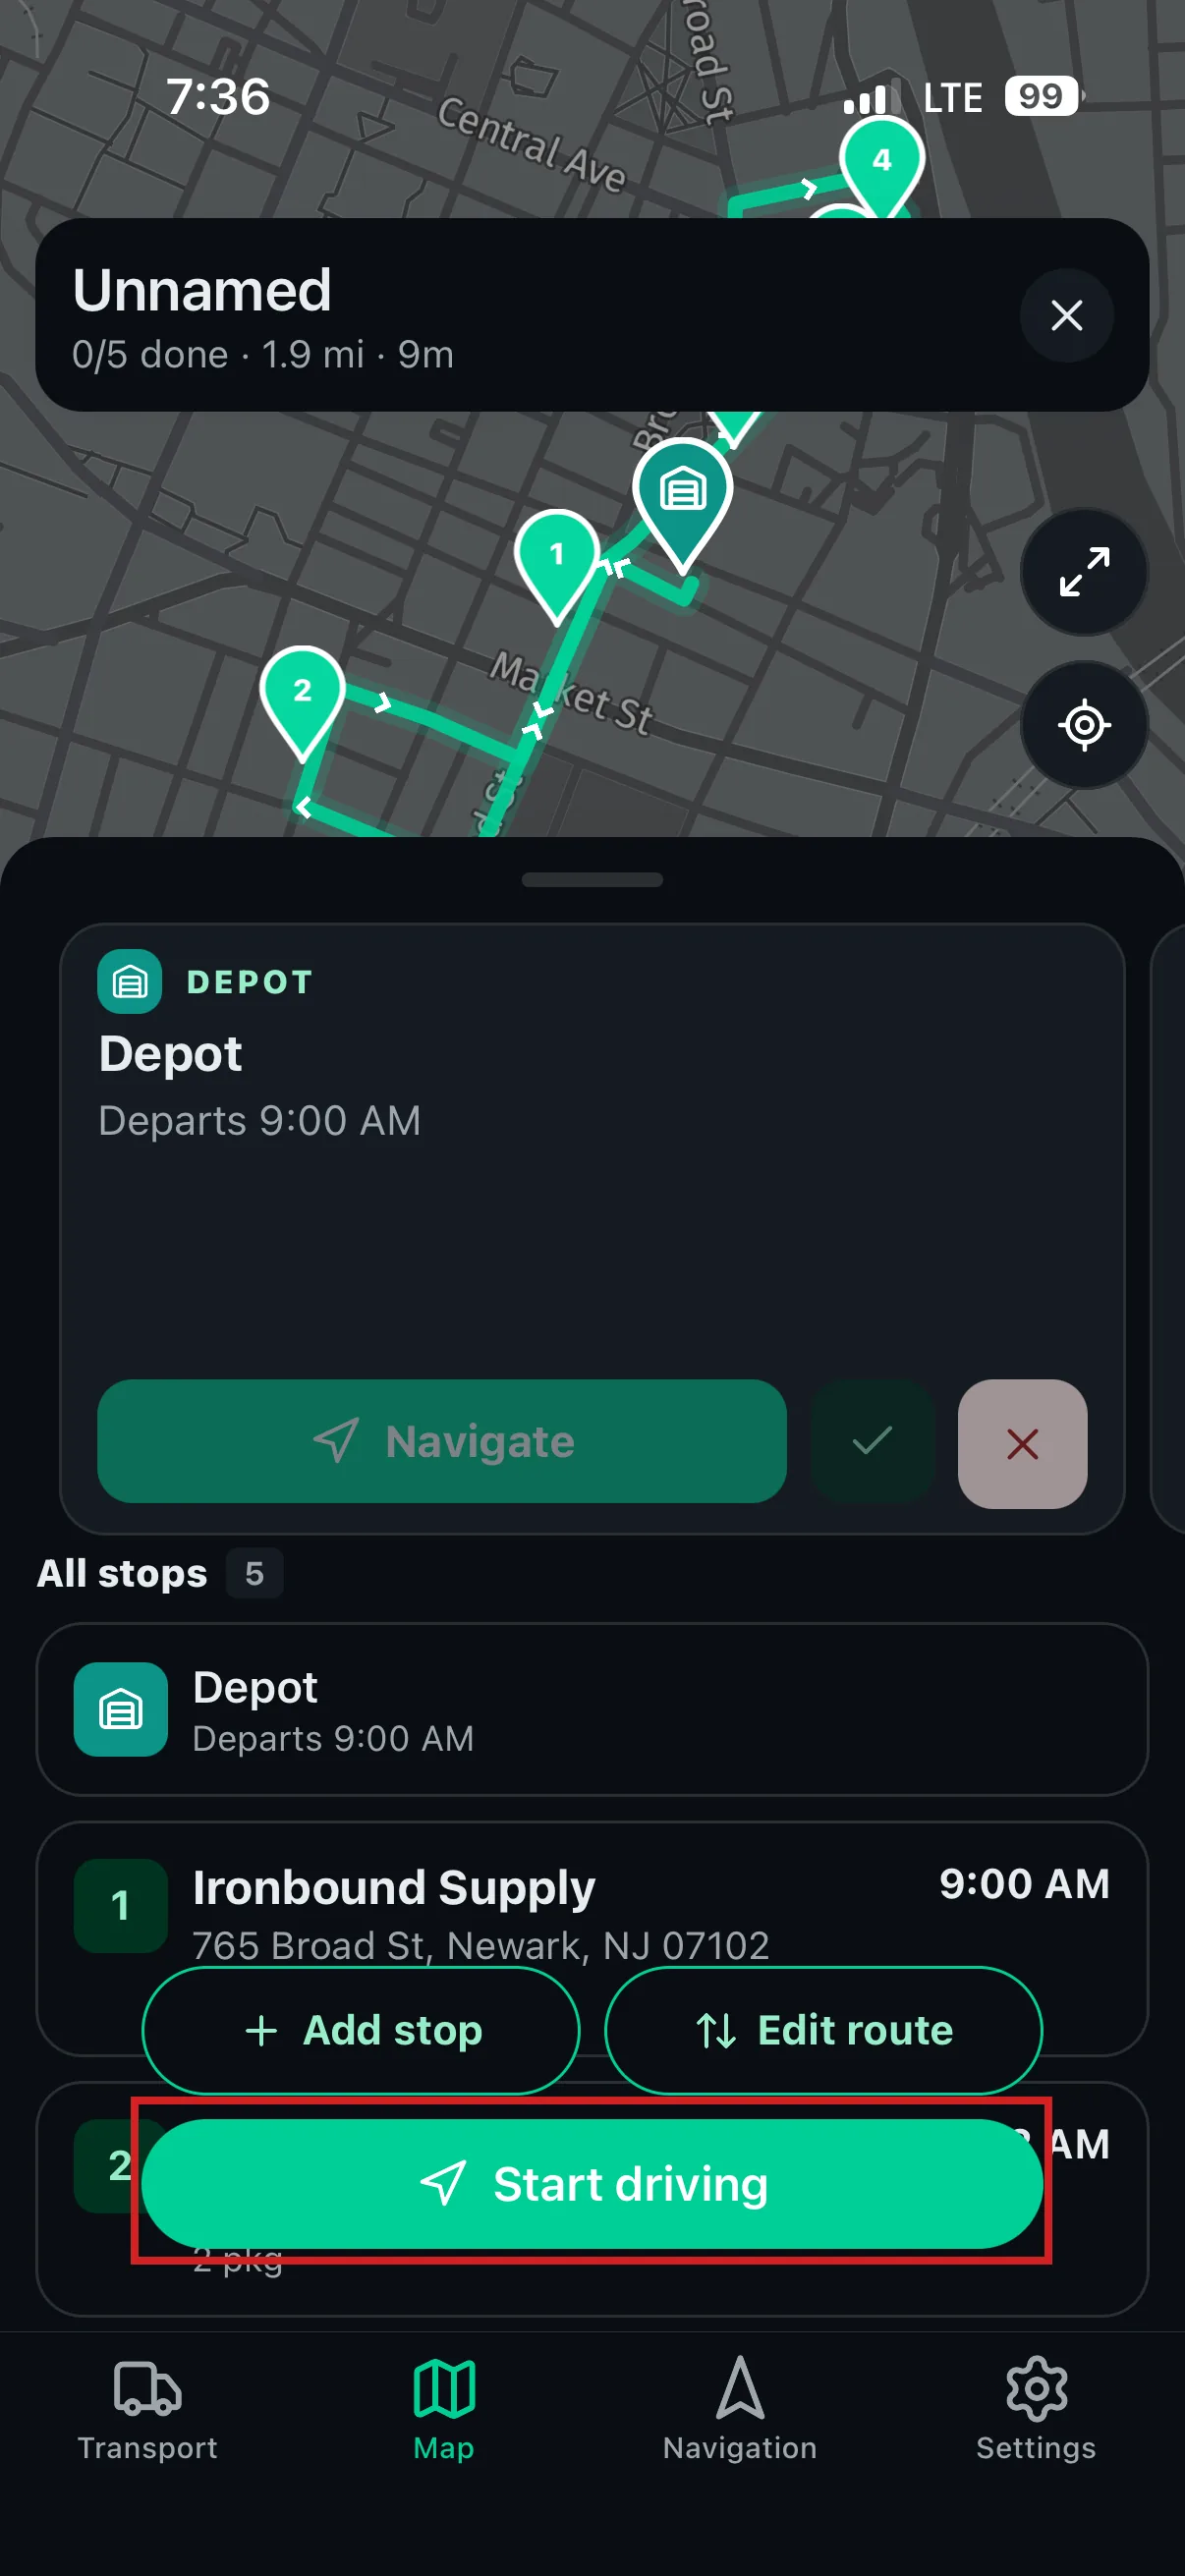
Steps 1–2 · Receive & Start
Driver App — receive route and view it
Driver App — start driving
Steps 4–6 · Arrive, Prove & Complete
Driver App — mark arrived at the stop
Driver App — proof of delivery form
Driver App — proof of delivery with photo and note
Step 7 · Exceptions — Failing a Stop
Driver App — mark a stop as failed
Driver App — choose a failure reason
Driver App — stop marked as failed
Note

Offline is handled automatically — stop actions and photos queue on the device and sync when coverage returns. Location sharing can be paused ("Pause location sharing") and auto-resumes after 30 minutes.

Note

If dispatch cancels or re-dispatches the route mid-day, the driver sees "Route canceled — This route was canceled by dispatch…" or "Route updated — …Select your new route." Delivered stops are always kept in history.

Scenario 14Mid-Day Changes: Reassign, Edit Live Routes, Cancel

GoalChange the plan after routes are already on drivers' phones — without losing completed work.
WhoDispatcher
Before you startLive routes (applied dispatch).

Reassign an entire route (driver called in sick, truck broke down):

1
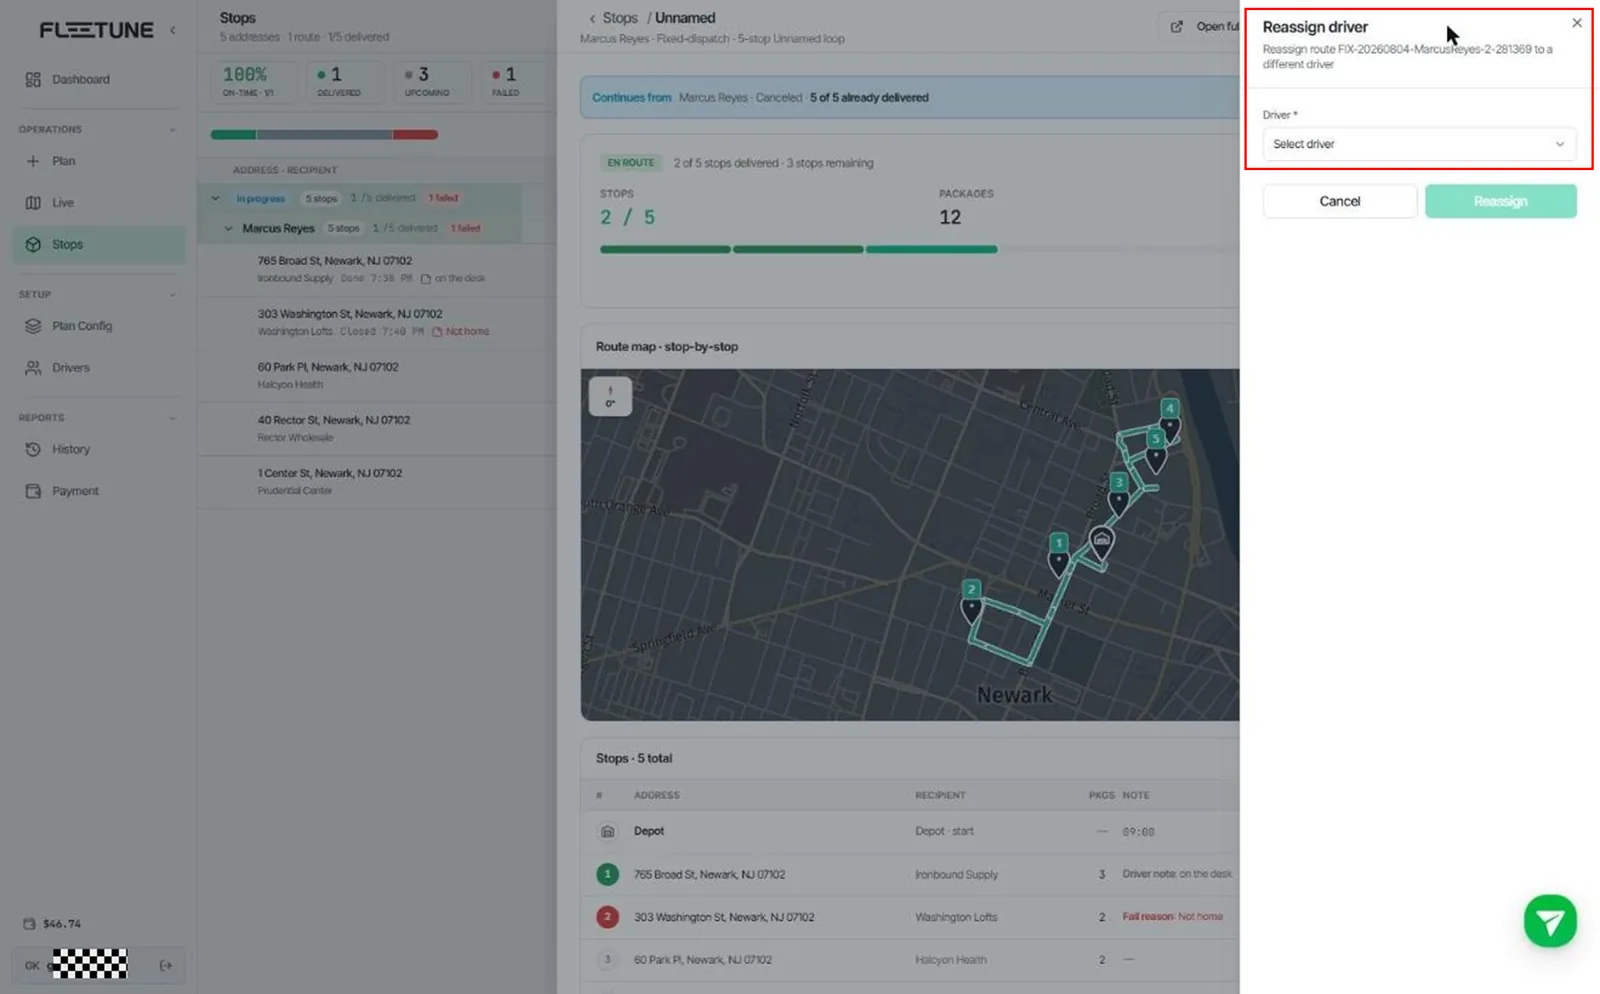
Open the route's Route Detail and click ReassignSelect driver → confirm. The old driver's app shows "Route updated"; the new driver gets the route.

Edit stops on live routes:

2
Open History, select the live dispatch, and enter the route. Drag to reorder, or use Reassign Stop / Reassign to another route / Remove from route (move to unassigned).
3
Changes collect as pending; click Confirm to push them ("Changes applied to live routes"). The drivers' apps update in place.
4
Every applied change is auditable — open Change Details to see Reassignment / Reorder / Mixed changes entries.

Cancel a route or a whole dispatch:

5
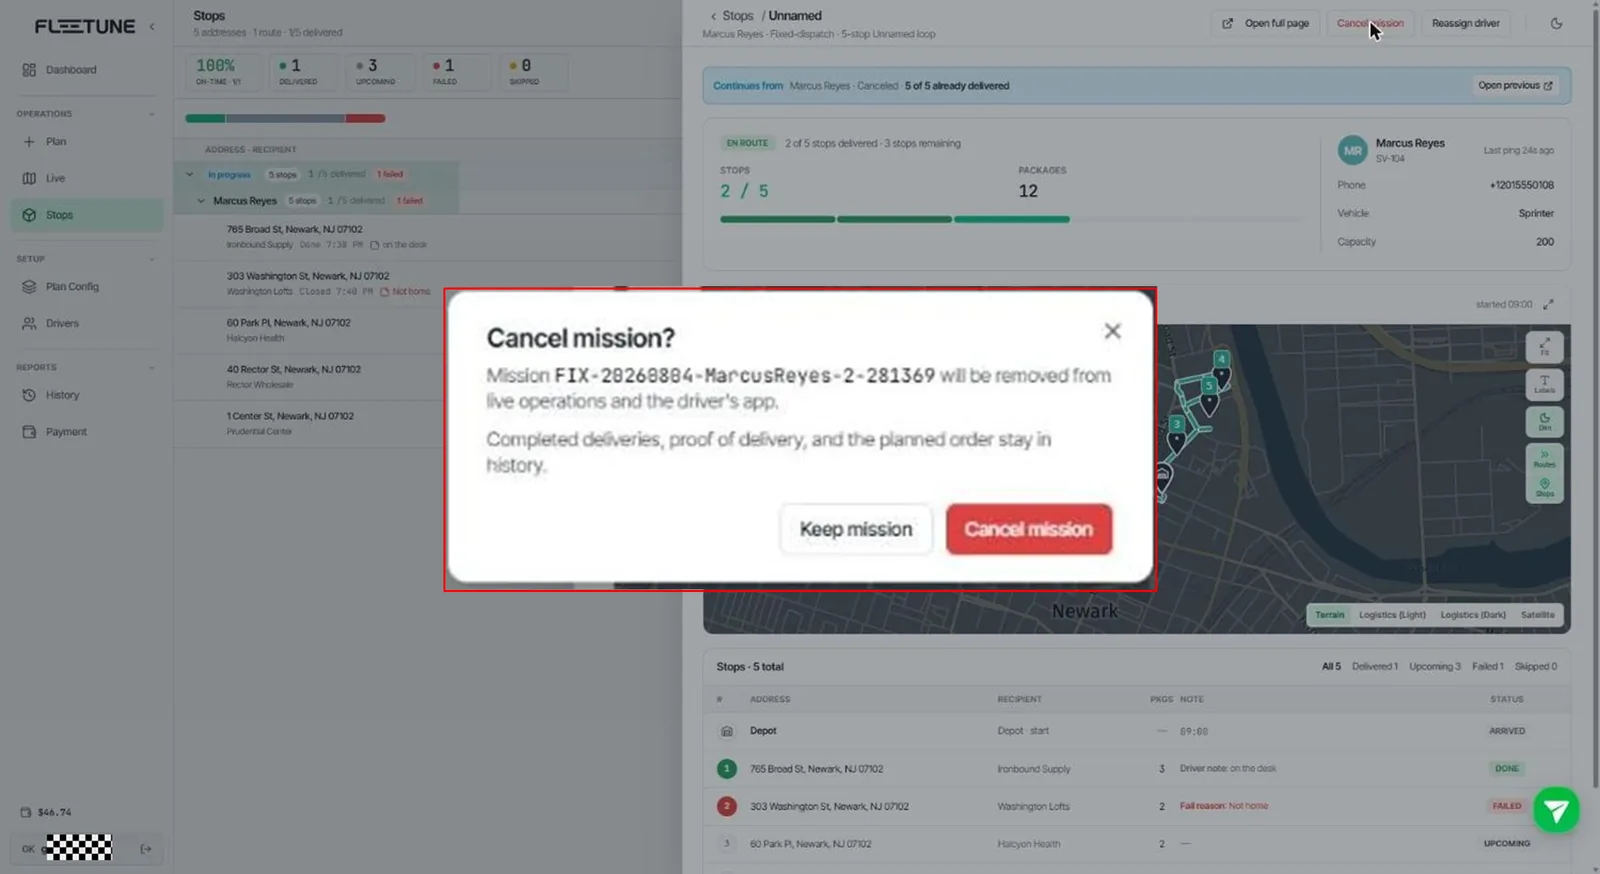
In Route Detail click Cancel mission, or in History use Cancel route / Cancel dispatch. The confirmation explains the effect: the route disappears from live operations and the driver's app, while completed deliveries, proof of delivery, and the planned order stay in History. Remaining undelivered stops are recorded as skipped.
Mid-Day Changes: Reassign, Edit Live Routes, Cancel — screenshot 1
Mid-Day Changes: Reassign, Edit Live Routes, Cancel — screenshot 2
Note

Canceling is a record-keeping action, not a delete — History keeps the full picture for reporting, and the canceled route remains visible with a Canceled badge.

Part 4Reviewing Work — History and Dashboard

Scenario 15Review Dispatch History and Actual Driven Tracks
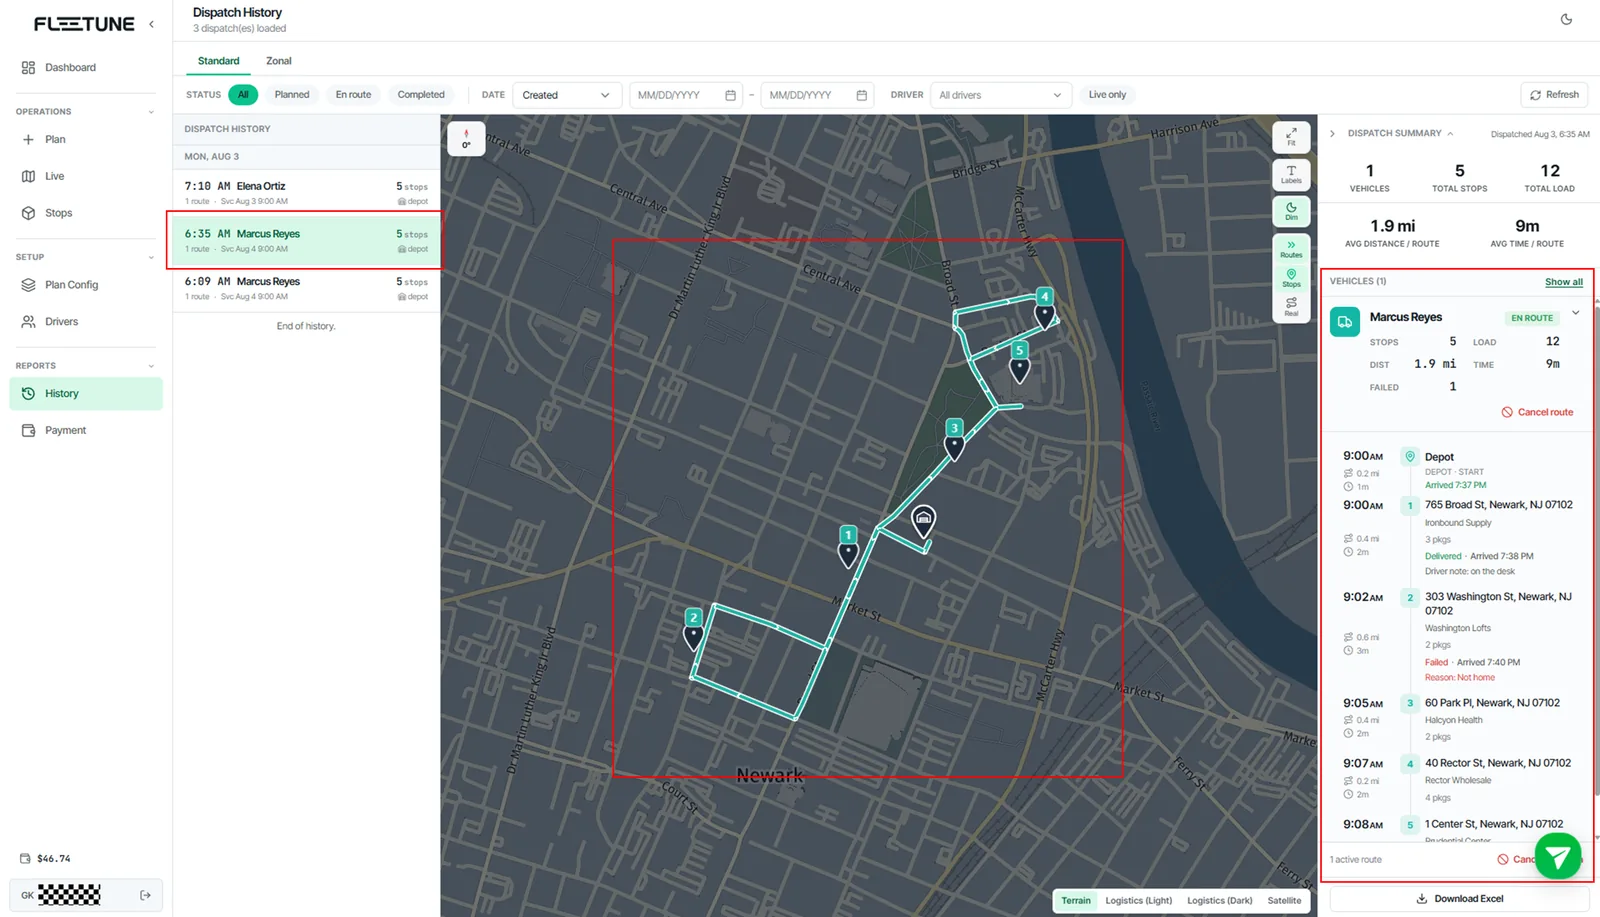
GoalAudit any past (or running) dispatch: planned vs actual, per-stop timeline, and what changed after deployment.
WhoDispatcher
1
In the sidebar under Reports, open History. The left rail lists dispatches grouped by date.
2
Filter with Date basis (service date vs created), a date range, Driver, and Live only (only dispatches deployed to live routes).
3
Select a dispatch to see all its routes on the map with the summary (Total stops, Total load, Vehicles, Avg distance / route, Avg time / route, Standard/Zonal).
4
Select a single route for the stop-level timeline: departure from depot, per-stop distance / drive time / service time, Estimated arrival vs Actual arrival ("Arrived {time}"), failures and skips with reasons, and end-of-route arrival.
5
Turn on the Real map layer to overlay the actual GPS track the driver drove against the planned route line.
6
Open Change Details on a dispatch to review its post-deployment edit log.
Review Dispatch History and Actual Driven Tracks — screenshot 1
Tip

A dispatch that was created but never applied can be published from History later — Publish routes creates the live missions and notifies drivers, exactly like Apply on the Plan screen.

Scenario 16Read the Dashboard
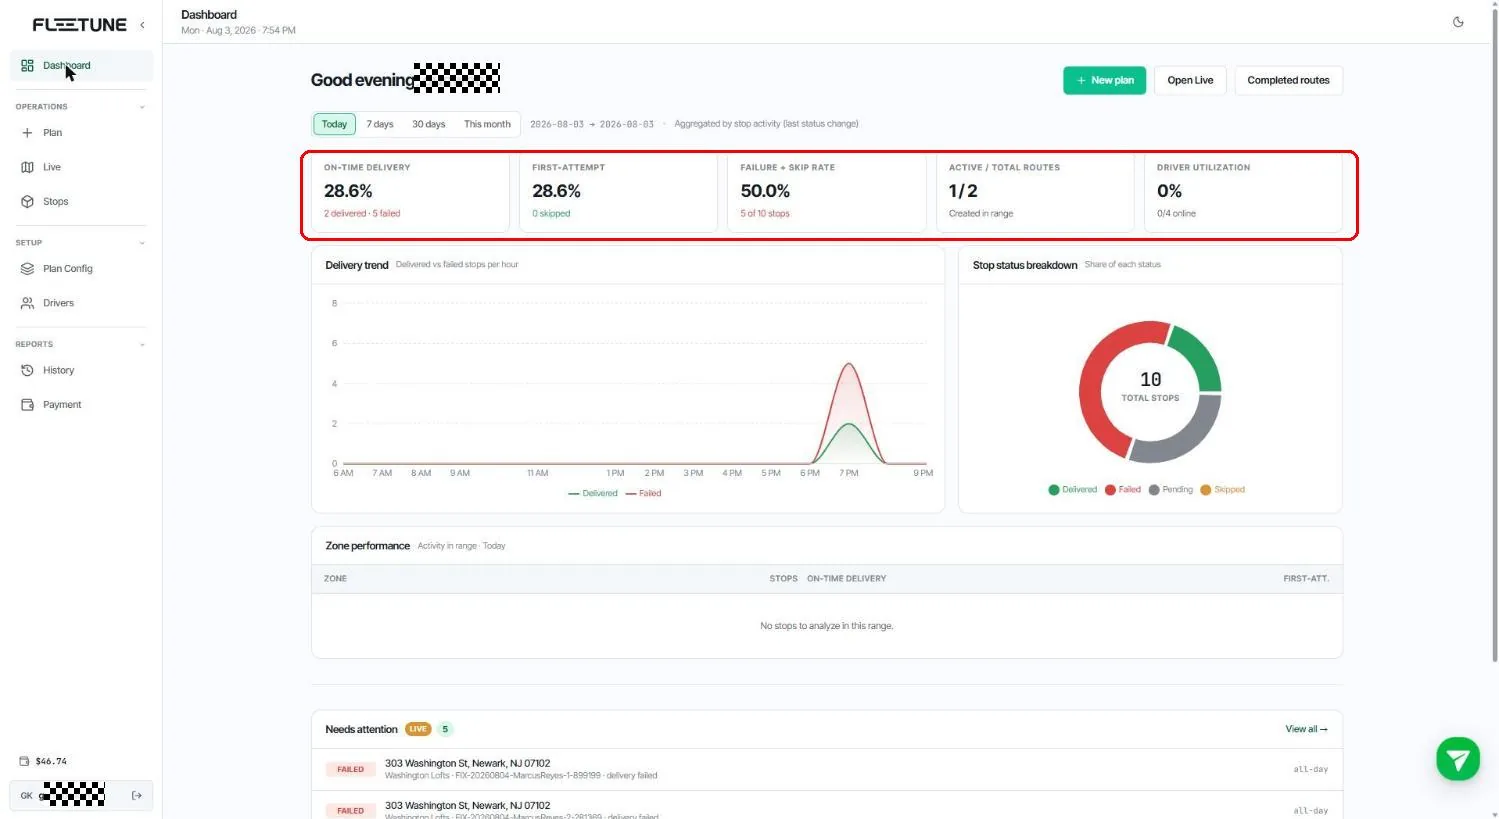
GoalA morning-coffee view of operational health, and a triage list of what needs attention right now.
WhoDispatcher
1
Open Dashboard. Pick a range: Today · 7 days · 30 days · This month.
2
KPI strip: On-time delivery, First-attempt, Failure + skip rate, Active / total routes, Driver utilization.
3
Charts: Delivery trend (delivered vs failed per day/hour), Stop status breakdown, and Zone performance (per-zone stops, on-time, first-attempt).
4
The Needs attention panel lists live problems — Failed, Blocked, At risk, Skipped, Unassigned — each linking to the stop or route. "All clear. No issues right now." means exactly that.
5
If any driver has requested account deletion from their app, a banner appears here (and on Drivers) so you can coordinate offboarding.
Read the Dashboard — screenshot 1

Part 5Billing — Prepaid Passes, Stops, and Add-Ons

Scenario 17Buy a Pass and Understand What's Included

GoalKnow how a prepaid pass is priced, what it grants, and how to top it up.
WhoDispatcher (account owner)

Fleetune is sold as a prepaid pass. You pay once, up front, and there is no recurring charge — nothing renews automatically. A pass grants two things at the moment of purchase: a vehicle count and a pool of stops, both usable until the pass expires. The price and the stop pool depend only on how many vehicles you buy; the duration you pick simply decides when the pass expires.

1
In the sidebar under Reports, open Payment.
2
Pick a plan, a number of vehicles (minimum 3 on a first purchase), and how long you want to use them — 30, 60, or 90 days, all at the same price.
3
Review the preview: vehicles, stops granted, expiry date, and total. Then pay.

Plan

Per vehicle

Stops / vehicle (granted in one lump)

Starter

$39.00

500

Pro

$69.00

800

An Enterprise plan is available for larger fleets at negotiated pricing — contact Fleetune for a quote.

Note

Buying again while a pass is still valid stacks: the new stops are added to your pool, and the expiry date moves out by the full duration you picked — your remaining days are never thrown away. Vehicle counts are cumulative and cannot be reduced, because a pass is paid in full up front.

If you run out of stops before the pass expires, buy a stop add-on on the same page — it adds stops without changing the expiry date.

When a pass expires, any unused stops are forfeited and have no cash value, drivers are suspended, and the account becomes read-only until a new pass is purchased. Purchasing again restores access. For exact current rates, see the pricing section at us.fleetune.com.

Scenario 18Review Usage and Transactions

GoalAudit how your account's usage and charges have accrued over time.
WhoDispatcher (account owner)
1
In the sidebar under Reports, open Payment.
2
Audit usage in the Transactions table (Date / Item / Qty / Stops left).
3
Filter by category (Stop, Dispatch, Settlement, POD Photo, Coming Notification) to isolate a specific type of usage.
4
The usage donut on the same page shows where usage went by category, at a glance. Pass history lists every purchase, add-on, and admin grant with the days and stops it added.
Note

A failed apply never records usage — every entry you see in Transactions maps to a completed operation.

Appendix AStatus Glossary

Term

Where

Meaning

Upcoming

Stops, Tracking

Not yet attempted

Delivered

Everywhere

Completed; "Delivered late" = after its ETA (SLA miss)

Failed

Everywhere

Attempted, could not deliver; reason recorded

Skipped

Everywhere

Passed over (driver or dispatcher); reason recorded; unfinished stops of a canceled route are recorded as skipped

En route / At stop

Missions

Driver rolling / dwelling at a stop

Behind / Blocked / At risk

Missions, Dashboard

Schedule slipping / stuck / predicted to miss

Planned / Completed / Canceled

Missions

Route lifecycle

Online / {n} min ago / Offline / No schedule

Live

Driver location freshness

Unassigned

Plan, Stops

Stop not attached to any route

Appendix BTroubleshooting Quick Reference

Symptom

Check

Driver can't sign in to the app

Phone number on Drivers page matches the device; use Resend code

Driver shows Offline while driving

Location permission "Allow all the time"; battery-saver exclusion; location sharing not paused

Dispatch button disabled

Tooltip explains the reason: no geocoded stops, no drivers selected, zone without driver, or unassigned named routes

Stops failed to import

Open "Parse errors detected", fix the listed rows, re-upload; check the template column names

Recipient link shows "expired"

Links close after the delivery is finalized; copy a fresh link while the route is live

Routes don't reach the driver

Apply (or Publish routes in History) actually run? Driver signed in with notifications allowed?

Appendix CSupport

Questions or issues: contact us from the website's Contact form, or email support. Legal documents — Terms of Service, Privacy Policy, Refund Policy — are available in the site footer at us.fleetune.com.

Ready to run your first dispatch?

Prepaid passes start at $39 per vehicle, with 500 stops granted up front — minimum 3 vehicles, no auto-renew.

Start Free Trial